Sunday, February 26, 2012

Learn To Crochet

I have some really cool crochet patterns that I've made up & I really want to share here. First, I wanted to share where I learned to crochet. . . .


Yep.

Actually, The Art Of Crochet by Teresa is the best I've seen. Her videos are from her view & she is really good at explaining exactly what she's doing. I'm going to post links to her videos that teach some of the most frequently used stitches. While your on her channel you can find some of her patterns & tutorials. She has the ability to take something that seems difficult {like a cupcake beanie} and make it easy enough that even someone who is just learning can do it. Most of her videos have links to show you how do it left handed as well.

Chain {ch} This is the most basic stitch you'll need to know:


Single Crochet {sc}


Half Double Crochet  {hdc}:


Double Crochet  {dc}:


Triple Crochet / Treble Crochet {trc}:


Slip Stitch {sl st/ sl st tog}:


Wednesday, February 15, 2012

Lamp Make Over: Project Aqua Spray Paint!

I know, I know, everyone and their mother has done a lamp make over. There are thousands of tutorials and examples of beautifully redecorated lamps out there in blogland. But I hadn't done one yet. And I wanted too, so I thought I might as well share. This is what I did in early November:
I adore this lamp and it adorns the room that belongs to my youngest two children.
I started with a lamp that had been gifted to me by a friend who was moving and was sure I could do something special with it. I am so thankful to her:) I laid down a plastic tarp in the yucky part of my backyard and that would become the workspace for my lamp make over.


I used Krylon Indoor/Outdoor Spray Paint in "Blue Ocean Breeze." I'm partial to anything that references the ocean:) I didn't want the paint to get all drippy, so I made sure I held the spray can a good 6"to 8" inches away per the instructions (make sure you follow the paint can instructions). I sprayed the lamp twice allowing it to dry ten minutes in between and I sprayed the lamp cord as well, but I don't recommend doing this. It just gets all tacky. And I probably should have stuffed a paper towel in the socket that holds the light bulb, but I didn't. I'll do that next time though. (Krylon did not pay me to use their product- they don't know me from Adam)


And this is how it looked:


But I wanted more. Something to make it look a little more special. Which is the reason it took me so long to post this. I could not find the ribbon I wanted to use though I know it exists, because I have a little in my possession and I kept thinking that someday I would find it again. Well, i finally gave up, but I like this polka dot ribbon just fine.


I will explain my projects in as much depth as possible because I was asked too:)


So, I took a length of ribbon (still on the spool) and wrapped it around the lamp shade to see where I needed to make the cut. Once I had that measurement, I cut the ribbon and added some sticky back Velcro to the edges. This is what I would use to secure the bow on the lamp.


Next, (I didn't measure- sorry- I just eyeballed how much ribbon I wanted to use for the actual bow) I cut another short length of ribbon from the spool to use for the actual bow part of the decor. I folded it in half to mark the middle. Then unfolded it again and brought one edge in at a time to the middle marking and then hot glued it down. Repeat for the other side.


Your bow should look like this:


Then I cut a very small piece of ribbon to make the center of the bow and hot glued it to the back.


If you flip your bow to the front, it should look like this:


Next, I folded the very first ribbon strip (the one that I used to wrap around the circumference of the lamp) and marked the middle with a straight pin. That is the location that I would glue the center of my bow to.


I applied the hot glue to the back of the entire length of the ribbon:


and secured it to the other length of ribbon:


Then I wrapped it around my lampshade and velcroed the ribbon in pace and this is what it looks like:


I really love it. It is simple, but it has a little something that says, "I'm special."


And there you have it. One more lamp make over to add the rest!
Happy Crafting!
xoxo,
Amy

Monday, February 13, 2012

Booty Buns GO GREEN ♥ GIVE CHARITY Giveaway


Daily Mothering is hosting a giveaway event 
& one lucky winner will receive a 
lifetime supply of  
That's 20 cloth diapers in the winner's color choice, 
40 inserts, 20 liners & 2 flannel/micro-terry wipes!!!!


Booty Buns *Go Green Give Charity* Cloth Diaper Giveaway Event


You can sign up now to participate as a blogger by clicking here
Daily Mothering will also be giving away an Original Booty to the blog who 
refers the most people!! Hurry and sign up now because the linky will be closed 
when the limit of 200 blogs is reached.


GO GREEN ♥ GIVE CHARITY

Super Anti Spyware

My super techie friend who introduced me to GIMP, also introduced me to the world's best {& free} virus protection. Now he works in Washington DC for a huge firm that does IT security for the federal government, so this guy knows what he's talking about!


Its called Super Anti-Spyware. All you have to do is go to their website & download the free version. They have one you can pay for; honestly, the free version works so well I've never paid for the upgraded version. I run the program anytime I start to have issues with my computer, whether its running slow, the mouse is being dumb or pages are taking forever to load. 


*What about your Norton, you ask? 
Well I'll give you this to chew on. Do you know that most viruses are found on PC vs. Mac? Ever notice how every time you buy a PC they give you Norton for free? Hmm, Norton must be pretty easy for hackers to tackle.  Plus I think that Norton works like a 'line of defense' to stop viruses from attacking; whereas, Super Anti-Spyware cleans up all the stuff that Norton lets in.


*Well, what if Norton is updated regularly?
 
I have a laptop that was 3 weeks old and had Norton installed in it. It was behaving in a very frustrating manner, but Norton never said anything about risks. I installed Super Anti-Spyware & removed 220 viruses that Norton didn't recognize.  Sound scary? Well that's nothing compared to what we pulled off Amy's computer when we installed it. She had 1,234 malwares found on her hard drive!! Hopefully she'll leave a comment telling you all how wonderful her computer is now running :) She mentioned that her computer was hiding some picture files from her, but thanks to Super Anti-Spyware, they are all found again!!

YAY!!


Ok, seriously this will change the way you use your computer & plus if you don't like it, it's super easy to uninstall.


The other super amazing thing he introduced me to is called Returnil. Now this program works like a false hard drive. Its best for using before you go to a known contaminate site such as Myspace or kids' game sites. Its also free to install. If you turn it on, your computer will run just like normal. The difference is that once it restarts your computer goes back to how it was before you turned the Returnil on.  So the viruses get saved to this false hard drive & your real one is safe the whole time!!


The only down side to using this is that if you forget to turn it off, you will lose anything that you are working on like papers or pictures. I use this when I let my 9 year old play on the computer, but sometimes I forget that its active & bookmark things or create docs. One way to save those important bookmarks or docs is to email them to yourself. They won't be on the hard drive when you restart; but, you cam pull them off your email & save them.
It seems like a bit of a hassle, but its nothing compared to 2 hours waiting for 1,200 viruses from kids' sites to be removed!!


Good Luck & Happy Almost Valentine's Day!!

Sunday, February 12, 2012

Almost As Good As Hawaii and I was tagged . . .

Sometimes I can still here the wind blowing the leaves of the coconuts trees outside of my bedroom window. I long for the days of laying by the ocean shore watching the waves roll in. I can't be in Hawaii anymore, but I can bring the flavors of the island to my kitchen table. Ready for the taste of Hawaii . . . here it is . . . (This recipe is from my friend, Lori)
Waikiki Meatballs:
You can make homemade meatballs if you like, but I like the shortcut better:
1 32 oz bag of home style frozen meatballs

4T cornstarch
1 c. packed brown sugar
2 cans pineapple tidbits
2/3 c vinegar
2T soy sauce
2/3 c chopped green pepper (optional)

Place frozen meatballs in the crock pot.
mix other ingredients in a medium bowl and add to crock pot.
Cook on low for 4 hours ( I stir it once or twice the second two hours)
Serve over white rice . . .
Enjoy!

Also . . . I was tagged by my friend, Ang, over at Sparkles and Bugs. She writes a Health/Fitness/Craft blog and is worth getting to know. I haven't played tagged for years, but these are the rules:

Here are the rules:
*Post these rules.
*You must post 11 random things about yourself.
*Answer the questions set for you in their post.
*Create 11 new questions for the people you tag to answer (sorry I just used the same questions)
*Go to their blog or facebook page and tell them you’ve tagged them.
So here we go with ELEVEN Random Things About Me:
1. I was MVP of my high school soccer team.
2. I Graduated from BYUH with a B.S. Degree in Special Education.
3. I taught school for three years and then became a stay-at-home-mom.
4. I bought my first car for $1200 when I was 22 years old.
5. I lived in Hawaii for SEVEN years.
6. I almost drowned at Waiamea Bay in 10-12 foot waves.
7. I sleep with three pillows
8. I wish I had a sister
9. I must have my toenails painted at all times.
10. I use sunless tanning lotion religiously from March to October.
11. I belong to the church of Jesus Christ of Latter Day Saints.

Okay now for the questions that Ang asked me:

Favorite Book?So hard to choose because I LOVE to read! I will say that I have read the Hunger Game series and I am way excited for the movie to come out in March.
Weights or Cardio? Weights
What is your biggest fear? not being prepared
What is your favorite TV show? Castle
What is your favorite food? Shrimp Scampi
What is your most beloved item? Camera
What is your favorite gift to yourself? shoes
What is your favorite drink? Water
What would be your dream job? Novelist
What is your least favorite vegetable? Brussel Sprouts
What is your favorite memory? My first date with my future husband. Surfing at Waikiki in the shadow of Diamond Head Crater (volcano) in the early evening. So fun!

Here is another thing about me. I only like rules when they work in my favor. I don't want to tag 11 blogs . . . I am only tagging two (because Ang already tagged all the bloggers that I know personally:))
I tag:
Bandy Canyon
Honeybear Lane
By the way . . . you should check these blogs out!

Thursday, February 9, 2012

Sweetheart Stroll Winner

We have a winner!!


Congrats to Regan S!!


Thanks to everyone who entered!


If you entered but didn't win, 
& we'll give you free shipping on your first order until February 29, 2012. 
Be sure to include the number of diapers & color you prefer.


We still have a giveaway on our blog that doesn't end until February 14, 2012 & another on Tidbits' blog that ends on February 15, 2012. If you haven't entered those yet, be sure to hop over & enter.


:)


GO GREEN ♥ GIVE CHARITY

Show And Tell . . . This is what I Made Today

Occasionally miracles happen. My two youngest took a nap at the same time. For a long time. Which was oh, so wonderful because I've been feeling the creative itch. I've been wanting to make a bib necklace and I have been inspired by some nontraditional color combos as of late. So this is what I came up with: Red, yellow, aqua, black and white


Black, Aqua, hot pink and Russian Lace with decorative buttons on a black stretch lace:


Red, Aqua, bright yellow, light pink with russian lace and a brown bow and a decorative white ribbon secured onto an elastic piece.

Bib necklace upclose

I kind of made up the pattern for the bib necklace as I went along. I used rolled flowers and flowers that I burnt the edges on, some tulle with burnt edges and I hot glued them onto a felt "u" shaped strip using ribbon as the chain to wrap around my neck. I also used buttons and a brad as accents. Find a tutorial here.

Pink, Aqua and black, decorative buttons, sequins and Russian lace


I hope you feel inspired. Oh! By the way, I noticed that Persnickety Clothing is selling their Spring/Summer Line for 65% off right now. I love the clothes but hate the prices, so this might be your chance to get a deal!
Happy Crafting!
XOXO,
Amy

Friday, February 3, 2012

Cleaning With Peanut Butter

I knew that you could use peanut butter to get gum out of your hair and tar* off of your feet and tree sap of off your hands, but it had never occurred to me to try it to remove that sticky residue that store tags leave behind. Until today.
I hate removing tag glue. In fact, sad to say, you can see many an item in my house where a tag was only half heartedly removed. Well those days are gone because peanut butter did in fact remove that sticky gunk that a price tag often leaves behind. I stared by removing as much of the tag as possible.


Then, I used a pea size amount of peanut butter and pretty much massaged it into the left over glue with my finger.

Once it was really worked in, I used a paper towel to remove the glue and and the peanut butter.

It looked as good as new. Give the spot a quick wash with soap and water and there you have it!


Happy Cleaning!
xoxo, Amy
*I grew up in So Cal where summer beach trips were a frequent outing, sometimes tar would wash up from the ocean and get mixed in with the sand and stick to our feet. Hence the neccesity of tar removal from feet:) I thought you might wonder:)

Three Simple Valentines Crafts and the Winner of the Headband!

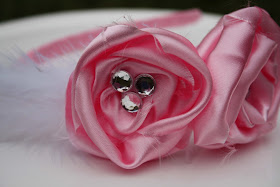
Before we get to the cute Valentine's Day Crafts, it is time to announce the winner of the beautiful Cambria Headband! The winner of this pretty pink satin flower headband is . . .

MamaHunfy!

Congratulations Mama Hunfy! You won simply because you are a follower and we hope you'll spread the word about Amy's Craft Blog. In order to claim your prize I need to hear from you by midnight tomorrow night or I will draw someone else. Email me your address to:


Thank you for being a follower of our blog!

The next follower only give away will happen when we reach 100 followers . . . I will soon show you the prize and tell you how to be entered multiple times, but for now . . . on with the crafts!

---

Now, Onto the Crafts!

It honestly took less than an hour to produce these three crafts and I did them with my kids which made it even more fun. Yes, I said more fun:) This is what we did: 1. Heart Shaped Crayons (thank you Pinterest)
2. Decorative Plate
3. Decorative wood blocks.
I don't like spending a lot of money to decorate for "small" holidays, so these were all really cheap crafts as well.
1. Heart Shaped Crayons First of all you have to strip all the paper off of the crayons and then chop or break them into fourths. The smaller the pieces the better they look when they are melted. Then I put them into my silicone heart shape mold and cooked them in the oven on 250 degrees for 15-20 minutes. You'll know they are ready when they are all melted. Remove from oven. Let cool and harden completely (30 minutes or so) and remove. Done:)


2. Decorative Plates I picked up some clear plates at Walmart for a 1.50. Then I picked up some tissue paper for $2.50. Then I had the kids use paint brushes to cover the back of the plate in modge podge (you can also use Elmer's school glue). Then I cut the tissue paper in half and we covered the plate and smoothed the tissue paper down all over the plate. When it was completely dry, I trimmed the edges. Done:)

The kids hard at work:)

Don't worry if the glue seems plentiful, it will dry clear:)


3. "Be Mine" Painted Wood
First, I asked my neighbor if we could have a few pieces of wood from her wood pile. Then we painted them. Then we used an old glue lid and placed it onto a craft paint bottle to make it easier to write with the paint (this step does take some practice as you can see from my sloppy writing). Then I sanded the edges to add a little character. For the smaller block I measured some tissue paper to fit the block of wood, then covered the wood with Mod Podge and placed the tissue paper on top and gently smoothed it down. I also sanded the edges of that block and I think it looks cool.

Before any sanding was done


I hope this is something that you will enjoy doing! Happy Crafting!
xoxo,
Amy

Time To Reward A Follower!

Thanks to Shannon's Blog hop we have reached our goal of 50 followers and that means it is time to give this pretty little baby away!
I will announce the winner on Monday . . . I know you can hardly wait. The next give-away will be when we reach 100 followers. I'll give more details on that on Monday! Have a great weekend!

Avoiding April Showers

We've signed up for another blog hop event "Avoiding April Showers" from April 16-30.

Keep close to find out what we're giving away!!If you're a blogger interested in joining, click the hyperlink above.
Each blog will have a prize worth $25 or more. 

:)

Thursday, February 2, 2012

Create Something That Will Bring You Closer!

** Announcement: Please See Here to participate in the Blog Hop Give Away. 15 blogs are giving away a gift worth $25 or more until Feb 8th. Prizes include a cloth diaper, $25 to TGI Fridays, Hair accessories, jewelry and much more- check it out!
Have I told you lately that I love Pinterest? Well, I do. I'll shout it from the roof tops! I found this little baby on pinterest, via mama-jenn.blogspot.com and let me tell you why you should make this:
Because this will grow your relationship. This will provide the "in" you need as your babies grow into teenage-hood. (if you have teens already you can still use this- what teen doesn't love praise or crave acceptance. You could use this to tell them the positive things that you see them do or the things you love about them and I guarantee this will bring you closer! (Even if they don't write back) These are the ones I made with my kids:


I kept it really simple. I printed the words from my word program, traced the decorative edge pattern with an old piece of a scrapbook paper and used a piece of scrapbook paper to decorate the front. I cut out what needed cutting and my girls glued it all on. You could use a composition book, a spiral notebook or a fancy journal. It doesn't really matter.


My babies are growing up. There ain't no way to stop it! My oldest will soon be nine and with all the hustle and bustle of life, I worry that we don't connect as much as we should. I think it is so important to forge bonds now that will help us survive the ups and downs of the teenage world. Let me back track . . .


Are any of you old enough to remember passing notes in school? Do they do that any more or do you just secretly text from your pocket? Me and my BFF in high school had a notebook specifically designated to writing notes to each other and each other only. We passed it back and forth between classes and breaks. The coolest thing about this? I still have it. Lets just say I graduated before the turn of the century, so to have this notebook from her and read all the silly things we wrote to each other is so precious. I LOVE to read what we wrote and what or concerns were from day to day and how we pledged to always look out for one another. Now I want to share notes with my own sweet girls.


Two out of my four are old enough to write to me and I tell you they took to this idea like ducks to water. I just kept it simple. me and the girls decorated the front of a spiral notebook and before the glue was even dry, my six year old was writing me a note telling me how "cool" she thought I was. I am loving this already!


The idea is to write a note and then leave it under your child's pillow for day-to-day communication. This might be fun to do with your hubby too! As you continue to write your notes you will see this book become a journal and a chronicle of your life with your child. I can't wait to see how this all turns out!


Thanks Jen! This was exactly the idea I was looking for!


Happy crafting all!


xoxo,


Amy