Monday, December 16, 2013

Why You Shouldn't Spray Paint Your Door

It's been one of those days...


There are so many reasons why you should never spray paint your front door. So, so many.

Let me explain.
I think I am having a mid life crisis.
 That is strange in and of itself because I am only 35 29.
What led to this crisis you may or may not have asked? Well, today I am not pregnant. Again.
After almost 10 months of trying. Yeah, boo-hoo. Everyone has his or her own sob story, I know. Remember I am just trying to give you an insight into my crisis. Had I attended my exercise class today, all of the madness that was to ensue today might have been avoided because I would have got a fix of endorphins. But alas, it is canceled until after Christmas.
So madness ensued.


Since I was not pregnant, I needed a change. I considered making throw pillows for my couch. I have the fabric and have been wanting to do this for some time. But instead I decided to paint the front door.
 I painted it black.
With spray paint.
Why? Because I had black spray paint in my laundry room. Had I had a quart of black chalk paint, there would be no need for this post.

Something I will never be accused of is being a perfectionist. Good enough has always been, well, good enough for me.

I began by taping off my door frame to protect all the places I didn’t want painted. This part of the job went quickly enough. I taped plastic sandwich bags around the hardware and taped computer paper to the small window and called it good.

I began to spray. My three year old helped.
At first I thought, “Hey, this ain’t half bad.”
Then I realized we were standing in a cloud of black mist.

That black mist settled on my white tile floor like a soft blanket of new fallen snow. Maybe a more accurate description would be "like new fallen ash."  It also stands to reason that that gentle mist also covered my nearby carpet and furniture (though I can’t see it.)

I quickly retrieved my Swiffer Mop and Clorox wipes and irritably cleaned the mess.

Then I blew my nose. You guessed it. Black.

But all in all, the door looks good. At least it looks good enough. My friend, Ashley confirmed this for me. Another plus, it took less than 45 minutes. (unless you count cleaning up the black mist- in that case it took 2 hours)
Then other problems arose. Have you read that book, “If you give a mouse a cookie?” Here is my adaptation:

If you spray paint your front door you re going to realize that you also need to paint the trim.

When you paint the trim you are going to realize that you really want new hardware to make your door look just right.

When you get the new hardware you are going to want a new red chevron print throw rug to place in front of the door.

When you get your trendy throw rug you are going to realize that you want to trim your door frame with a fresh cut garland because it is Christmastime and you spent too much time on Pinterest going on virtual “Christmas Home Tours.”

When you remember that it is Christmas, you will remember that you have spent all of your money already and that is why you used the spray paint that just happened to already be in your laundry room.

Once you realize this, you will agree with yourself that for now, simply painting your door black is good enough. You can get to the rest next year.

In summary, if you are going to spray paint your door, take it off the hinges and do it outside. And be prepared to want to make over your whole entryway. And maybe you should just make a pillow instead.

Happy Crafting and Merry Christmas,
Xoxo,
 Amy

Wednesday, December 11, 2013

Free Printables: Christmas Subway Art

Merry Christmas! It actually feels like Christmas here in the desert because it is actually COLD! There is even snow on our mountains! Last year at this time we were enjoying weather in the 70's.
I just wanted to let you know something...
I have found a new creative love!
 Designing subway art and the like on my photoshop elements! It is a great artistic outlet because there is no cost! I can create and create and not spend a dime on supplies!

I wanted to give you a gift of free printables. I don't know how to create a download I could Google it, but right now I am feeling a bit too lazy to do so.

Instead you will just have to right click and save this little picture. It is a hi high resolution 8x10 and I hope you enjoy it!


 I got the chalk board background from We Lived Happily Ever After.
She has tons of designs and fonts and fun stuff that she offers for free.
I honestly can't remember where I got the fonts but I have a link to them on my Font Pinterest Board.
You can find all the fonts and link that I used to add them to my computer on that beautiful little board!


I made this one for my friend, Ginger to use in a lesson that she is going to give at her church. I love the colors on this and I think it is something that you could leave up all year!

Anyhoo,
 Merry Christmas!
xoxo,
 Amy

Family Photography

Wow! Tis the season to be busy! This is my busiest time of year for my photography hobby. It is actually supposed to be a business, but I live in a small town and it is hard to make a living off of my friends. In essence, it is my non-profit organization....
This is what I have been up to: (plus two more that I already erased from my hard drive!)
To see more, you can go to my photo blog: Amy Davis Photography


Happy Crafting!
xoxo,
 Amy

Monday, November 18, 2013

Growing Your Family Through Adoption


 Adoption
You know what it is like to have a friend that you love 

and would do anything for?

 The kind of friend that you laugh with and plot with and hurt with?

 I have loved ones that hurt and I wish I had a magic wand to wave and make everything better.

 I have something important on my mind... 
My dear friend, Castina, was just able to adopt her first child.
 She and her husband had tried for years to start a family and finally got pregnant only to lose their sweet baby boy late in the second trimester. He would have been my daughter, Raia's age. The last two weeks have been full of sweetness for them because a mother was willing to place her child into their arms. 
I am so happy for them. They have dreamt of being parents for so long and now they get to raise a beautiful son. This child's birth mother gave my friends the most beautiful gift that one could give.
 But there is more... 
My dear, sweet friend, Ashley  and her Husband Quinn Ellis are now trying to adopt.
 They have one beautiful little girl who is my son's age. Sometimes my son wants to marry her. They found out they were pregnant with her shortly after they were married and were overjoyed. Never once did it cross their minds that it wouldn't always be easy to become pregnant.
 They have tried for five years to have another. 
For anyone who has struggled with infertility, you know how heartbreaking it can be. To say it is like riding an emotional roller coaster would be an understatement.  To long for a child is the deepest kind of yearning. November happens to be national adoption month. What I am wondering and what I am asking is if you can help spread the word about my friends, Ashley and Quinn. They are good people and a great family. If you know of a sweet little baby who needs a home, please learn more about them. Or if you would be so kind as to share this message so that the word might get out to someone who is looking to place their baby with a family that would treasure the opportunity. 
Ashley is the kind of friend that I wish I had a magic wand for. She and Quinn want to have a sweet little baby so bad and this is the only thing I can do to help. You can find their adoption profile here.
 
 xoxo, 
Amy

Sunday, November 17, 2013

Super Easy Lamp Makeover!

I was a tom boy growing up and so I kind of missed my girly phase. Thank goodness I have three daughters because now I get my second chance at all things GIRL!

I was at Walmart (because it is the only store we have in town) and as I passed by the clearance section I saw two small, ugly brass lamps for $4. Of course they were on clearance.Ugly doesn't usually fly off the shelves.
But I had a vision of what these ugly brass twins could be. I didn't have a lampshade yet and I didn't want to spend a fortune so i waited. I waited for 5 months until I found these little zebra lampshades on sale for $3. SOLD!
I spray painted the base of the lamps with a Krylon paint in watermelon. I added a little bow to the lamp shade with hot glue and felt completely satisfied. Best thing . . . .it was soooooooo easy!
It makes me happy to look at them! Train your eye to spot a diamond in the rough!
Happy Crafting!
xoxo,
 Amy

Baby Shower Gifts for Girls! Homemade Headbands!

I should have put this with my previous post! I also made these cute little headbands for my unborn niece!
I was in such a hurry to get out the door that my picture quality suffered a little bit, but you can get the general idea.

I didn't make this hat, but the flower is made out of an old shirt. I cute out about 8 circles the size of the bottom of a soup can, and 1 circle slightly smaller for the center. I folded all the circles in fourths except the smallest one, glued them onto a small piece of felt. I hot glued the center to the top and then glued a button on top. I attached an alligator hair clip to the bottom of the felt piece and secured it in place with a ribbon to hide the hot glue. Then I stuck it onto this cute t, which I did not make because I am not that talented.

 The two headband pictured above are made out of baby tights measured about 13 inches long. Headbands are great for headbands because they are so stretchy! The can go from newborn to about 6 months! I hot glued the ends together and wrapped a small piece around the glued spot to protect baby's head. The flowers are made out of various size circles cut from satin and polyester with the edges slightly burned to prevent fraying. I also added a little tulle and ribbon. The centerpieces are decorative brads and a chevron pattern bottle cap.
 The headband pictured above and below are different types of stretch lace. Above flower above is made the same way as the other two above it and the bow below is made out of  felt. I didn't measure it. I just cut a piece the length of the rectangle felt squares, folded the two ends into the center and hot glued. Then I put a dab of glue in the center and squeezed the center together. Then I tied  a ribbon around the center, because I wanted it to be pinched together tighter. Then I cut another little strip to wrap around the center of the bow and hot glued that in place. I glued that onto the lace and put another small piece of felt on the bottom to protect baby's head from any rough glue. Find a bow tie tutorial here and here.
 It really is easier than it sounds!

 Happy crafting!
xoxo,
Amy


Personalized Baby Shower Gift

My husband has nine brothers. I have three. This combination makes for a lot of weddings and a lot of baby showers! I attended one yesterday for my unborn niece. She will be the tenth baby girl born on my husband's side of the fam.

I made this for her on Photoshop Elements, printed it off at Walmart and put it in a big white frame. It made my sister-in-law get all teary, which of course was the point!

Happy Crafting!
xoxo,
 Amy

Friday, November 8, 2013

DIY Thanksgiving Decor: Painted Burlap Pillow

This is a repost from two years ago. I still love my "Count Your Blessings" Pillow and It is actually on display on the planters shelf in my bedroom all year round (unlike my Christmas Pillows).

From November 2011
Not that I am complaining but I seemed to have missed Thanksgiving. Not in real life thank goodness, but in the virtual world (which is way less tragic:)) Why you may ask (or maybe you won't ask- but I'll tell you anyhow).
 
Well, one week I participated as a vendor in a huge event that My city puts on called "The Festival of Trees" It is a holiday event that showcases entertainment, Decorated Christmas tree and a boutique like shopping experience. After that was over, I began to prepare my home for Thanksgiving holiday guests, While I was cleaning my garage, my baby decide that she needed to pull our luggage rack (that hooks onto the back of our car) on her toe and all but sever it. You can imagine the panic and frenzy that follows such an event. It is encompasses, ER visits, stitches and lots and LOTS of follow of visits. We are still waiting to see how it will all turn out. You can see why I have been absent form the virtual world. Lucky for me, virtual life continues to go on:)


I did however make this cute little pillow out of burlap and cotton:
You can also customize a pillow for yourself or a neighbor gift for Christmas:


You will need:


Burlap


White cotton Fabric


Sewing machine


White and black thread


ribbon


batting


Black paint


Textile Medium


1. I got a yard of burlap (super cheap stuff) and cut out pillow squares. I didn't measure, I just made sure I had two matching pieces that I could sew together.

2. I cut out my white fabric to a measurement that would fit in the middle of my burlap pillow.


3. I painted the phrase I wanted on the white fabric by mixing a textile medium wit craft paint and then heat setting with my iron as per manufacturer's directions.


For the "Joy" phrase I used a homemade stencil. If you have a cutting machine then good for you, but I had to print the word "JOY" from my computer and then create a stencil.


Directions for Stencil. Print out word from your computer and trace on freezer paper. Cut out using an exacto knife. Once your word is cut out, place in desired location on fabric (shiny side down) and iron for temporary hold. Cut out a matching size piece of freezer paper to iron onto the opposite side of fabric so that your paint won't bleed and spread. Mix paint with textile medium and paint proceed to paint your stencil. Let stencil dry, remove freezer paper, and heat set according to manufacturer's direction.


4. Sew black border around your white fabric to frame your phrase and then, pin to burlap and sew it on with white thread.


5. Take your burlap pillow pieces, turn them inside out and pin them into place and sew them together with white thread. Make sure to leave and opening about 2 inches wide to stuff pillow with batting.


6. Turn pillow right side out and stuff with batting and either hand sew closed or sew it close with your machine (which is what I did. It was hard, but it worked.)


7. Garnish by adding a ribbon. (you can sew it on if you want too)


And you are done! Cute and easy!


Happy Crafting!


XOXO,


Amy

How to Make A Wreath Form Out Of Foam Tubing That Doesn't Lose Shape!


When I heard there was a way to make my own wreath form more cheaply than buying one, I was all over it! Last year I bought some foam tubing that I bought in the plumbing section of ACE Hardware. I then proceed to make a bunch of wreaths that looked good for like... three days. 
Maybe four. 
BIG FAIL!
The problem: they began to lose their shape. They looked all saggy and pitiful. They looked anything but appealing.
Last month the crafting bug hit me again. I stood in my craft space looking at my wasted foam pipe and longed to make a wreath that would hold it shape. 

Then it dawned on me: I should just use an old wire hanger!
When I was in third grade, my teacher had us make a wreath out of an old wire hanger and sandwich bags. It held it's shape just fine. See, who says you can't learn life lessons in school?!

So I did.

 I twisted it into a circular shape and taped the two ends together with duck tape. Then I covered it with the foam tube and taped those ends together. I wanted my wreath to be a little chubby, so I used a whole bunch of grocery bags for padding. I just wrapped them and taped them in place.


Then I added fabric and flowers and other embellishments and this is what I got:


and this, but without the padding of the grocery bags.

and this:


and this:


 I hope you make wonderful things!

Happy Crafting!
XOXO,
 Amy

Make a Snowman out of Pumpkins! Kid Friendly Craft!


I wrote this post for my cousin's blog last year. I know it is a little early for Christmas, but I wanted to give you time to save your pumpkins so you know what is possible!! Might as well get your money's worth out of them!

Christmas 2012
Many of you may find yourselves snuggling around a crackling fireplace gently nursing a warm cup of hot chocolate. Maybe your drapes are drawn open and you can see gentle white snowflakes undulating through the air until they finally join the thick blanket of snow that makes up the landscape of your winter wonderland.

That would not be the case for me.

Until last week, we were still enjoying weather in the 70 degree range. Quite lovely weather really. Though it hardly makes one feel like Christmas is coming.

Since we Southern Nevadans are lacking in the snow department, my kids and I made this:


 I would am delighted to tell all of you  how to make this super easy snowman out of your Halloween/ Thanksgiving Pumpkins.

You will need:
Three pumpkins (compatible snowman sizes)
White paint
Black felt
Orange felt
Hot glue
Two sticks for the arms
Scarf
Paint brushes
sciccors

This really is quite simple. The most difficult part is making sure your pumpkins sit on top of each other without falling.  I set my four kiddos to work painting three orange pumpkins white. They did a really splotchy job, but they had a great time.

Next we cut out shapes out of felt. Two larger sized circles for the eyes, a triangle for the nose out of orange, and 4 smaller size circles for the mouth. I hot glued these items on for the kids.

I sent them out to the yard to find sticks for the hands. I had to start a small hole in the pumpkin with a knife, then I jammed the sticks inside the hole.

Lastly, we tied on a little orange scarf and viola!
We may not have snow, but now we have a snowman!

Merry Christmas!

DIY Pumpkins from Yo-Yo Flowers

I wanted to make a little Fall decor that could make my house pretty for Halloween and Thanksgiving. I like decor that does double duty so I don't have to change out so much! I like easy, quick crafts and if you do too, then you are in luck because this is pretty simple.
This is what you will need:
1. Assorted Scrap Fabric
2. Stuffing
3. Green felt for leaves
4. Some kind of stick for the stem (I used my dried up sunflower stalk)
5.Needle, thread, hot glue gun

For a Yo-Yo Flower tutorial, click here. But know that I modified my yo-yo's. I only cut out one circle and stitched around it instead of cutting to out and stitching them together.

I used a 1 large dinner plate  and one small dinner plate to make the outline for my yo-yo flower. You can use whatever you want to make your pumpkins as big or as small as you want.

Once I made the yo-yo flower I closed it about half way, filled it with batting, then pulled the string to close it. I used my son's pocket knife to saw down the sunflower stalks (you could just break a twig off of a tree) then hot glued them in. I cut a leaf shape out of the felt and glued that on as well.

I think these cute little pumpkins would look so cute as a centerpiece or on your mantle with the rest of your decor. that was my plan when I first began to make these, but I ended up putting them on a wreath instead.


I though ti t was fun an different. Here are a few more shots:


Hope you have a lovely Thanksgiving!
xoxo,
Amy

Thursday, November 7, 2013

Unsanded Grout Chalk Paint: UpcycledDresser

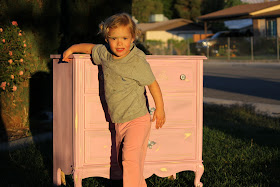
I had so much fun transforming this out-dated light yellow dresser into a shabby chic little pink piece of furniture for my pink loving three year old!

My friend Brittiany and I did it the same day as our Chalk Paint Wars: Which Chalk Paint is Best.

This is the recipe for unsanded Grout:

*Unsanded Grout Chalk Paint Recipe
1 cup paint 
1 Tbl unsanded grout
 add a Tbl water to the grout
 mix
 add to the paint
 Add more water if paint is too thick one tablespoon at a time
* it wasn't until after I used this that I read the back label which clearly states that this
 product can cause cancer. After reading this I don't recommend it when their are much safer methods to achieve similar results.

To see other chalk paint recipes click here:


This is the only "before" picture I remembered to take. That is Britt's Head:)


I spray painted the hardware a metallic silver in high gloss. I ended up not liking it though because it didn't match the major distressing we did with sandpaper and steel wool. So I ended up sanding the hardware too in order to make it look aged.

My Pink Lover Approved!

Here is a better picture of some of the distressing.

And here we are... the final product! It was fun and went relatively fast.
 I used to be afraid of painting because what if I {gasp} messed up. The truth is, sometimes you do, but it can always be fixed. So don't stress just do it. You are totally capable!

xoxo,
 Amy