A Dumping Ground For Good Ideas!

Everything That Makes A House A Home!


Wednesday, October 26, 2011

DIY Hair Clip Display and Two Layer Skirt

Look at those pretty flowers growing in the garden! Okay not really . . . my garden is almost dead:)

For weeks I have been trying to come up with a creative way to display the hair accessories and headbands that I make. I think I must have received my initial inspiration from my cousin-in-law, Heidi over at Honeybearlane.com. She made a beautiful centerpiece out of small tree branches. Then I saw someone at "What Women Want" with a tree branch display that earrings were hung from. And this is what I got . . . (I do have some better pictures at the bottom:) It was hard to take a picture in my usual spot because it was so windy today!)


This project is so easy and I think when I am done using it at The Festival of Tress Boutique, I will put it in my girls' bedroom to display their hair clips on. You can so do this. It is way easy.


I cut some branches from m y pomegranate tree, stripped the leaves and spray painted them white. After they dried, I simply put them in a large glass vase. I have some extra Styrofoam squares and I think I might try this again using them as a base.


I was pleasantly surprised that my head bands actually hooked on to the branches. I thought I would just be able to use my clips, but the headbands worked too!


Next . . .


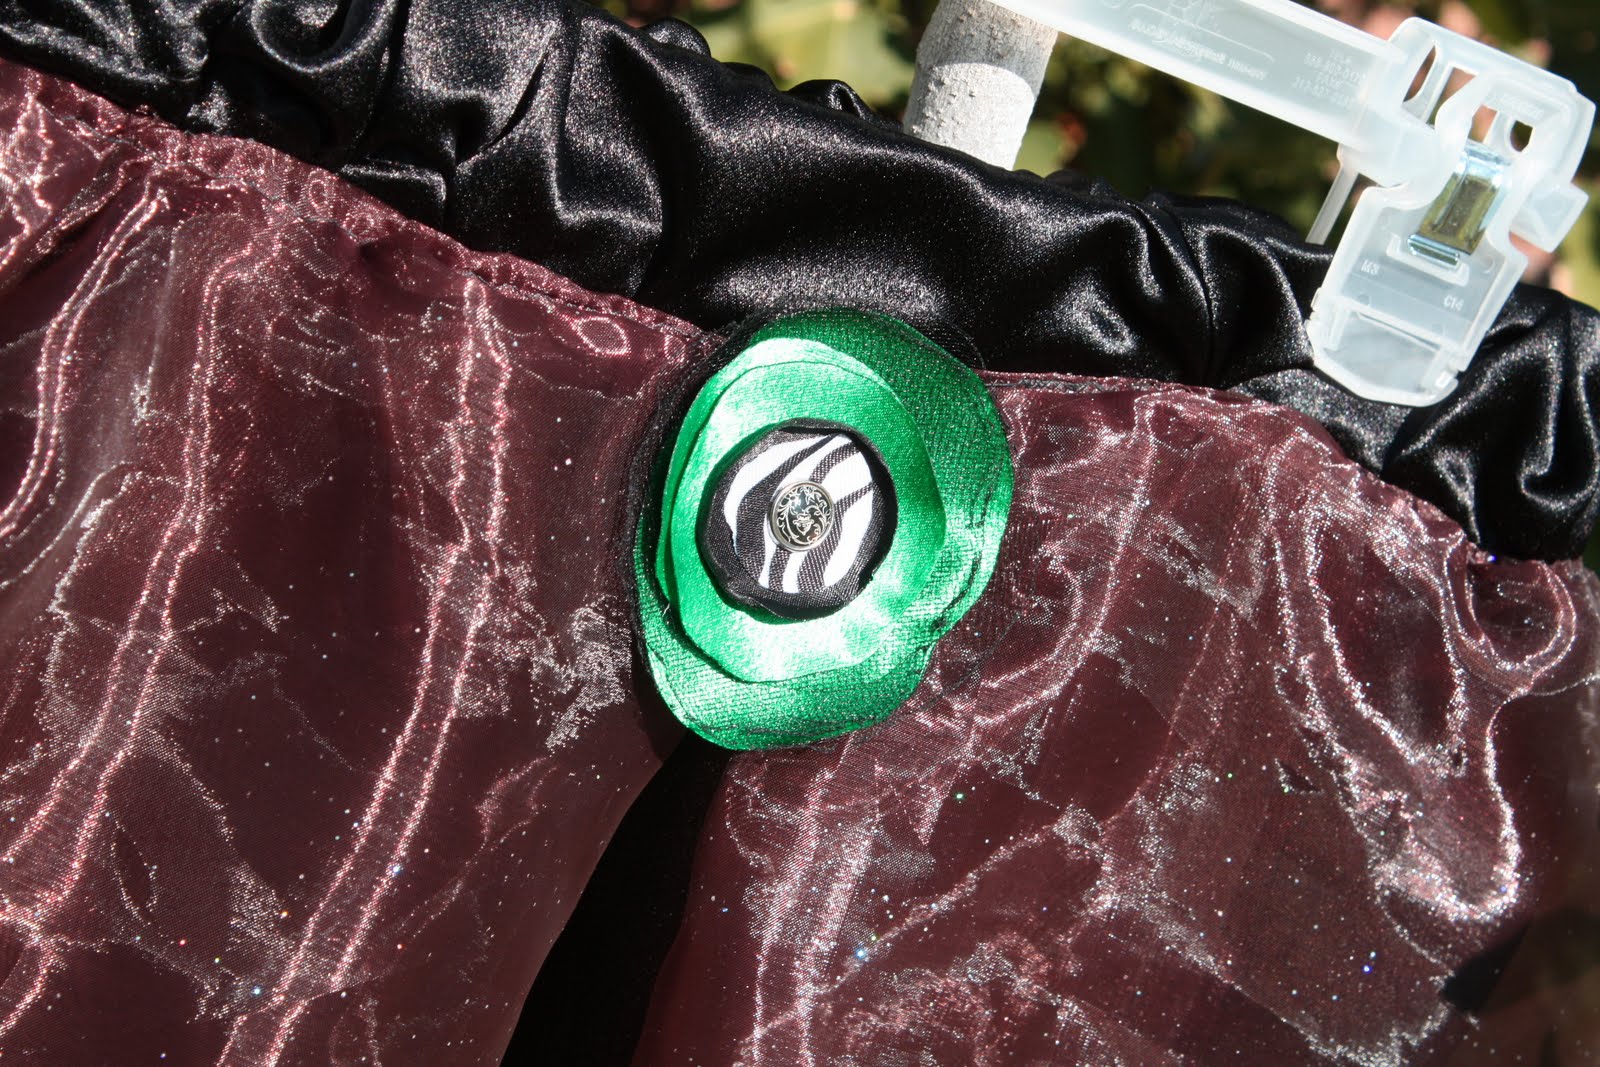
I love to make special occasions special with fun clothes for my kiddos. I have been trying really hard to make cute skirts and it seems like I am always trying out new ideas and styles in an attempt to find the easiest way to sew. I used my tutorial for the two layer skirt that I posted earlier to create the black satin bottom layer. For the shimmery overlay I actually burned the edges like you do when you are making flowers because I wanted that kind of a look. (plus, I was so sick of trying to hem this particular fabric). Then I used a gathering stitch for the top layer and sewed it to the satin layer upside down with a regular stitch. Then I folded it back over (so that it was laying the right way) and stitched it again. You can see that I made it lay and sewed it in a way that revealed the black satin underneath.


I made this skirt so that the flower embellishment was interchangeable. I took a flower hair clip that I had already made and added the pin onto the back of it. This way the skirt would be perfect for "black and orange day" (their semi Halloween celebration) at school and also for School Spirit Friday . . .


which is black, green and white.


Anyway . . . you get the idea!

Happy Crafting!

xoxo, Amy


Monday, October 24, 2011

Monday Night SpotLight

For the first time ever, I was able to go to the "What Women Want" Boutique held in St. George, Utah. It was a great way to celebrate my birthday. What a fun even that turned out to be! You name it and it was there. There was one little boutique that I fell head over heels in love with . . . Miss Plunkett Vintage Trimmings.

This booth not only had some of the cutest items, but the had, by far, the best presentation. They really knew how to stage a booth!

They sold belts, bracelets, necklaces, headbands and hair accessories. The coolest thing about this particular boutique is that you get to build your own accessory. Everything is interchangeable. You start with the clip and have the option to add feathers, Russian netting, multiple flowers and a beautiful vintage inspired. centerpiece. I bought this little beauty for $12.50.

Since I make hair accessories, I was greatly inspired. I am getting ready for our little town's big event called "The Festival of Trees." It will take place November 9-12 and will have booths, entertainment and food. It is a great way to get into the Holiday spirit.

This little beauty below is of my own creation. I like it just fine and it sells for $5. Thank you to Miss Plunkett for the inspiration.

Go check out Miss Plunkett Vintage Trimmings and see if you fall in love like I did!

Happy Crafting!

xoxo, Amy


Friday, October 21, 2011

For Little Hands- Halloween Witches

Do your little ones need something to do . . .?
I love doing crafts with my kids. And that is a good thing because with 4 little ones running around I don't really have much opportunity to hide away and create beautiful things. Mostly, I craft with my motley crew by my side. I have noticed that my girls have the same need for creative activity as I do. The boy . . . not so much, though he does LOVE to paint.

This is one of the Halloween crafts we did together. We made little witches and turned them into a centerpiece for our table.
I'm sure you don't need step by step instructions on how to make these little witchies:
I used:
glue (hot and Elmer's- or a glue stick)
construction paper (or cardstock or scrapbook paper)
yarn
raffia
googly eyes
skewers
The silver star is from a Christmas garland that got cut up a little:)
Basically I just cut out easy shapes and let the little ones use there imaginations. What I love is how they each turned out so different even though they had all the same supplies. I love how your child's personality is displayed through their creative side.


This was a s simple as can be, but the kids loved it and they love even more that there art work is currently being featured as out centerpiece.


Happy Crafting!


xoxo, Amy

Wednesday, October 19, 2011

So- Easy- Can't- Stop- Eating- It Peach Cobbler

"That was you who made the peach cobbler wasn't it? 
I was the one who had to clean all the dishes and when 
no one was lookin' I licked the dish clean!"
Funny right?! One of the elderly ladies in our ward told me that the day after our ward party. On a table full of desserts this was the first to go! You can make it too and be the hit of the next party!


You will need:
2 cans of country peach pie filling
One box of vanilla cake mix (I used classic white in this particular time, but I like vanilla better)
and a lot of butter (I used my country crock, it might have been equal to 1 1/2 sticks of butter)
Dump the pie filling in the dish, dump the cake mix on top, and cover the surface area with little pats of butter (it looks neater if you have a stick pf butter that you slice up and plop on, I just used a spoon to dish mine out of the butter tub)

Cook on 350 for 40-45 minutes but start checking at 35 minutes. The butter should be completely melted, the top should begin to turn a golden color and the pie filling should start to bubble through the sides.

Here is a close up of the crust and the bubbly pie filling:


mmm . . . so good. It can be served alone or with ice cream or whip cream. (My husband saw me writing this post and said, "Did you just make some?!" He was sad when he realized that these were pictues from the ward party:))


You can do the same thing with cherry pie filling or apple pie filling. I usually make cherry cobbler using vanilla cake mix, but I have also made it with chocolate cake mix on occasion and it is quite a decadent treat!


Happy cooking!
xoxo, Amy

Saturday, October 15, 2011

How Tall Are You?

Growing up , there was a special wall in our house that was and still is covered in pencil markings. Not those of a wayward artist that ran out of paper but pencil markings that measure how tall we were over the years. Next to the thick, dark, straight pencil lines were names and dates of the person measured. It was always so fun to see how tall we were! I was the oldest and was always taller than my brothers growing up. But at some point every single one of them passed me by a foot! Now my kids stand next to the measuring wall so that we can record their height as they wonder if and when they will ever be as tall as their uncles.


There is just one problem with these special measuring wall s. . . what if you move? You lose those sweet markings forever! So I have a solution for you . . .


Ta-dah! You can make your very own personalized take-with-you-anywhere- you move- measuring stick!


You will need:


a 6 foot piece of wood


vinyl people, hash marks and numbers 2-7 (optional)


Your favorite color of paint


sand paper


I made these as gifts for the two sets of grandparents a few Christmas's ago. They both say that it is the first thing that people comment on when they walk in the door. Now I drew my little people by hand with a sharpie and then sent them to my friend, Kim who scanned them into her computer and then turned them into cute little vinyl stickers, but there are lots of places that you can order them on line (if you don't feel like drawing them). My friend also added numbers and hash marks for me, which were a pain in the rear to put on. You don't really need them if you just want to record height from year to year.


These are just a few of the 14 I drew.


That is what it will look like in vinyl form. I have two nieces who passed away so I drew them with angel wings and halos.


Paint and sand your measuring stick according to your liking . . . add your vinyl . . .


And there you have it! Instant cuteness to measure with!


All the cousins love to see how tall they are and "who" they are up too. The little ones love to name off all of the cousins on the stick. It is great fun all the way around, I promise!


Happy Crafting!


xoxo, Amy

Friday, October 14, 2011

Cook/Klug Family Shoot

If you follow my other blogs then this will be a repeat . . . but if not . . .
This is the Klug/Cook family and they were very good to us when times were hard:) They are a sweet , playful and close knit family. This was such a fun shoot.


xoxo, Amy

Tuesday, October 11, 2011

RIP- Halloween Cupcakes

How cute are these to satisfy your Halloween craving?

While I was waiting in a doctor's office (something I do a lot since I have four kids) I saw this cute little recipe for a chocolate cake with "RIP" Headstones made out of cookies. I loved the idea and wanted to make it, but I thought cupcakes would be easier. No cutting and serving and plates and forks to worry about that way:)

So I guess I cheated a little bit because I didn't make the cake or frosting from scratch, but I did add an extra egg and a teaspoon and a half of vanilla to a white cake mix. And besides, My friend who is an expert at making cupcakes and frosting from scratch says she likes store bought chocolate frosting better than homemade anyway:)

So you will need:

Cake mix- whatever flavor is your favorite Prepare as directed adding extra egg and teaspoon and a half vanilla extract

Cup cake liners

2 cans Chocolate frosting

Milano Cookies from Pepperage Farm (Vanilla wafers would also work)

Basically you make your cupcakes according to the directions on the box. Let cool completely (put in freezer for a half hour if needed)

Fill a zip lock bag with chocolate frosting and cut a very tiny slit in one corner to pipe "RIP" onto cookie.

Frost cup cakes, cut a slit in the top of the cup cake with a knife for the cookie to be inserted into the cupcakes.

note: if you use a chocolate cake recipe you can crumble a little of the cake in front of the headstone to look like freshly turned dirt. I didn't do this because I used a vanilla cake.

So Yummy and so fun!

Happy Crafting!

xoxo, Amy


P.S. - Do me a favor and go here and click on my link (#512- at the bottom) so that I can be one of the most viewed links and e featured . . . please?

Monday, October 10, 2011

Bubble Skirt T-Shirt Dress


My daughter got invited to the Daddy-Daughter Princess dance at church.
The invitation mentioned that each Princess-King combo should come dressed in their royal attire ready for pictures, food and fun.


Since my 9 year old doesn't have a huge supply of princess dresses anymore,
I decided to make her one with a good twirling skirt.
It worked up really quick and looks great on.


WHAT YOU'LL NEED:
1 T-Shirt That Fits
Fabric For The Skirt
Fabric For The Lining
Measuring Tape
Needle & Thread
Scissors
Sewing Machine


First you'll need to get some measurements:


1: With the shirt on, wrap your measuring tape around 1 inch bellow the base of the sternum. Mark in a few places, then once its off draw a straight line & cut.


2: Measure around the base of the shirt and multiply by 2. This is the width of the skirt and lining. It is important to measure around the shirt and not the chest because you want some stretch when putting the dress on.


3: Measure from the same point at the base of the sternum to the knee. Add 4 inches. This is the length of the SKIRT only. Don't worry it will still fall at the knee.


4: Take the measurement from the knee and subtract 3 inches. This is the measurement for the length of the LINING only.


OK now that everything is measured and cut, get it sewn together.
With right sides facing, sew the lining and skirt fabric together along the long sides to form a tube. Turn right side out so that the seams are inside and adjust so that the skirt fabric wraps around the top and bottom, so that no lining is showing.


Fold the tube over on itself with right sides facing, put the machine back to
normal stitching and sew it together. Surge to finish off so it wont fall apart in the washing machine. If you don't have a serger, I've heard that you can use a zigzag stitch, but I've never done that so I can't advise you there. I got mine off craiglist for $90!! It had been used less than 5 times by a woman who had a 5 thread one, so this 4 thread one was 'useless to her.' I looked it up online when I got home and the exact model of it was $1000 brand new, so I recommend checking there first!


Now, adjust your machine so you can do a basting stitch all the way across
the top seam about 1 inch from the top. Make sure if your fabric has a direction
that its facing the right direction. Leave plenty of thread at the beginning and end so
it doesn't pull out as you gather the tube. It should look like this after gathering is done.
Leave the skirt inside out for the next step.


So after you sew the tube shut and have it gathered, then bast, the next part can get
a little tricky. Lay the shirt on the table. Fold it in half so that the back of the shirt
is showing. This point is where you will pin the middle of the skirt to.
The skirt should still be inside out and upside down to the shirt,
just like if you had a dress that was half way inside out. Make sure that there
is about 1/2 inch seam allowance as you pin all the way around.
Before you sew, hang it up from some where that you can get a clear
look at it to make sure that everything is level and pull out the basting thread.
Once everything is in place, sew the skirt to the shirt, then serge the raw edges.


Last you'll want to turn the dress right side out and check that everything is level.
If not just pin in place while hanging and hand stitch from the inside so that its level.
You can leave the skirt with the ruffle along the waist if you are using a cotton material,
but since I was using a satiny shiny material I wanted a cleaner look.
I used a blind stitch along the waist band with matching thread to sew
the skirt all the way to the shirt. It gave it a nice little band around the waist.
I also hand stitched the seam inside the skirt to itself at the bottom so it would lay
flatter at the hem.


Finish off the dress with some sort of embellishment.
I used this flower combination for her pin on her dress,
her corsage and for my husband's boutonniere.
For the tutorial on the flowers used click here.


They looked so good that night! I also made my husband's tie,
which I'll be posting a how to for that soon. :)


Tuesday, October 4, 2011

Vegekini. Vegekini?

An Easy Recipe.
My eight year old has a favorite dish. Homemade chicken broccoli fettuccine. That was to much of a mouth full for her when she was little so she called it "Vegekini." and it has been hailed as such ever since.
Ingredients:
8 oz pck of linguine or spaghetti, 1 cup fresh or frozen broccoli flowerets, 2tbs of olive oil, 1lb boneless chicken breast, cubed, 1 can cream of mushroom soup, 1/2 cup milk, 1/2 cup grated Parmesan cheese, 1/4 tsp pepper

prep/cook time: 20 minutes
cook linguine/ spaghetti according to packaging directions. Add broccoli for last 4 minutes. Drain.
Heat olive oil in a skillet. Add chicken, cook until browned.
In pot that you cooked linguine/spaghetti noodles, add soup milk cheese, pepper and linguine-broccoli mixture. Heat through. Serve with additional cream cheese.

I adjust the proportions as I need. You can't really mess this up:) and it really is yummy.

xoxo, Amy

Monday, October 3, 2011

Quick Roses


These roses are so quick to make and look adorable no matter where you use them!


I made this cute little corsage for the Daddy-Daughter Dance.

If you want to make something like this look for the yo-yo tutorial here
and the rolled rosette tutorial here.


What You'll Need:
Fabric [2 inches by 15 inches]
Small Piece of Matching Felt

Needle
Thread

Scissors

Center pieces [rhinestones, buttons or beads]


Take the fabric and fold it in half hot-dog style.


Once you have the 1 inch strip, tie your thread to one end and baste stitch to the other end.
Pull tight like you're making a ruffle, and roll into a flower shape.


Hot glue to felt and under each layer, then add your center piece.


Quick. Simple. Beautiful!