A Dumping Ground For Good Ideas!

Everything That Makes A House A Home!


Showing posts with label headbands. Show all posts

Friday, December 2, 2011

DIY Felt Headbands and Velcro Flowers!

I think I log a lot of bathroom hours . . .hold on, it's not what you think . . . I am the mama to three little girls (and one sweet little boy) so with four heads of female hair to do every morning, we log a lot of bathroom hours. See, I told ya, it wasn't what you thought:)
Because I have so many little girls, I have a fondness for hair accessories. Like these:

Brown Paper Packages is one of the lovely blogs I follow (and you should too) and she did a post about these headbands and I wanted to try my hand at them because I thought: no.1 they looked cute and no. two they looked easy! Mine are slightly different from hers however and I'll show you what I mean below.


I didn't want to use an elastic headband for my 8 and 6 year old so I opted for a soft plastic headband instead. I buy a special kind on line that don't cause any pain behind the ears so my kids actually don't mind headbands.


I attached the the soft part of the Velcro in one one spot only on the felt bow but put the tougher side of the Velcro in multiple places on the headband. The felt sticks to Velcro pretty good so I felt like I didn't need to attach both pieces of Velcro at every point on the headband.


I then proceed to attach the felt bows with sticky back Velcro. I added a little hot glue for added hold. The reason I did this is because I already have a drawer full of headbands and really didn't want to add more to it. The idea for me was to simply make the felt bow interchangeable.


The other difference is that I simply used craft felt because it is what I had on hand and haven't the foggiest idea where to get better felt. It would most likely require a trip to a larger town:)

Thank you Kierste, from Brown Paper Packages, for shring your cuteness!

I applied the same idea of interchangeable hair pieces when my third baby girl was born a little over a year ago. I didn't want to have millions of elastic headbands cluttering a drawer so I used the circle sticky back Velro again adding a little hot glue for extra hold.

That way I just had to change out the flowers to match outfits and when her head grew, I only had to replace one elastic headband.


Front of the flower:

Back of the flower!

Happy Crafting!
XOXO,
Amy

Monday, November 28, 2011

New Life to Old Clothes!

If you haven't noticed yet it is my SIL Shanni who does the stuff that requires more talent. She is WAY better with a sewing machine than I am. I am kind of a make-it-up-as-I go and if -all- else -fails- use- a-glue-gun kind of a girl. Now you know . . . the secret is out.

With that being said . . .

Being a mom of four I have been many sizes in my life. That means I go through a LOT of clothes! If you have been pregnant in the last five years or so you know that maternity clothes have gotten quite stylish and sometimes I find it hard to say good-bye to some of my cute outfits. But lucky for me I had an idea . . .


I convinced a fabulous photographer to do a photog class so that she could give me some tips on how to take a better picture. Well she agreed and she wanted to do the practice portion of our class shooting a "Victorian era" like tea party. I helped her collect props and design headbands and costumes for the event and it gave me a chance to use some of my beloved old clothes.


Case in point: cute shirt, cute skirt:
they went from this . . .


To this:


I'll post some better pictures of the details later, but these two beautiful girls are my daughters. My skirt became a long dress (I measured my daughters chest and sewed in elastic that fit her measurements, then I added a really pretty rosette ribbon for straps- it is hidden under a cropped sweater in the picture- and it became a new dress. It was sew easy!)


For my fair daughter my shirt became a short dress. I flipped it upside down and sewed in elastic that measured the length of her chest. Then I put it on her to decide where I wanted the elastic shoulder straps to go. I marked the right spot on the shirt. Then I wrapped the elastic shoulder straps in fabric that matched the shirt and sewed it in place the same time I sewed the straps to the shirt. I may or may not have used a little hot glue to hold the wrapped straps in place:) while sewing. Then I added to rolled flower rosettes in matching fabric to the the front of the shirt where the elastic straps met the fabric and simply pinned those on so I wouldn't have to worry about putting them in the wash. OH, I also hemmed over the existing hem a bit to make it fit the width of my daughter's body a little better. I cut off the shirt where the sleeves began an hemmed what was once the top of the shirt. (hem, flip and hem again). Then I added another skirt underneath for color and little extra length. This was a little trickier than adjusting my skirt.


The HEADBANDS are mad of stretch lace, rolled fabric flowers, paper flowers, glass buttons, flowers and decorative brads. Lisa and I made those.


Now these little outfits look so cute on my kiddos I thought: why did I not just adjust them to fit me? Oh well, live and learn:)


Happy Crafting!


xoxo,


Amy


Wednesday, October 26, 2011

DIY Hair Clip Display and Two Layer Skirt

Look at those pretty flowers growing in the garden! Okay not really . . . my garden is almost dead:)

For weeks I have been trying to come up with a creative way to display the hair accessories and headbands that I make. I think I must have received my initial inspiration from my cousin-in-law, Heidi over at Honeybearlane.com. She made a beautiful centerpiece out of small tree branches. Then I saw someone at "What Women Want" with a tree branch display that earrings were hung from. And this is what I got . . . (I do have some better pictures at the bottom:) It was hard to take a picture in my usual spot because it was so windy today!)


This project is so easy and I think when I am done using it at The Festival of Tress Boutique, I will put it in my girls' bedroom to display their hair clips on. You can so do this. It is way easy.


I cut some branches from m y pomegranate tree, stripped the leaves and spray painted them white. After they dried, I simply put them in a large glass vase. I have some extra Styrofoam squares and I think I might try this again using them as a base.


I was pleasantly surprised that my head bands actually hooked on to the branches. I thought I would just be able to use my clips, but the headbands worked too!


Next . . .


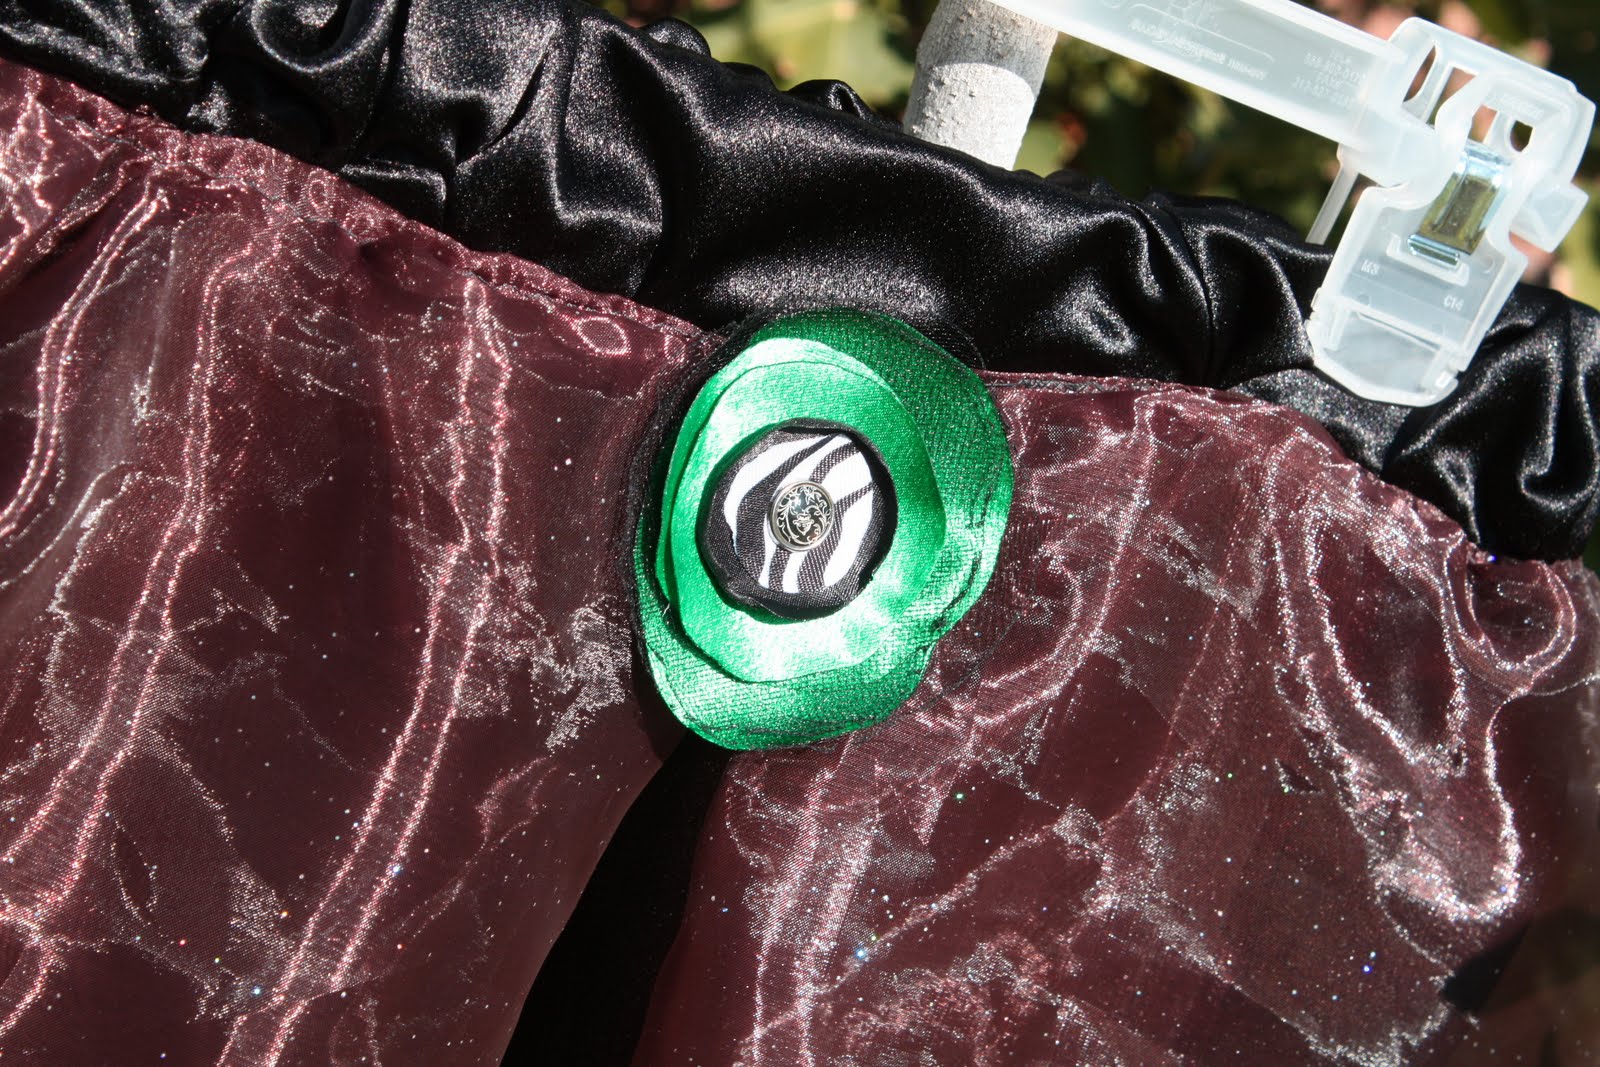
I love to make special occasions special with fun clothes for my kiddos. I have been trying really hard to make cute skirts and it seems like I am always trying out new ideas and styles in an attempt to find the easiest way to sew. I used my tutorial for the two layer skirt that I posted earlier to create the black satin bottom layer. For the shimmery overlay I actually burned the edges like you do when you are making flowers because I wanted that kind of a look. (plus, I was so sick of trying to hem this particular fabric). Then I used a gathering stitch for the top layer and sewed it to the satin layer upside down with a regular stitch. Then I folded it back over (so that it was laying the right way) and stitched it again. You can see that I made it lay and sewed it in a way that revealed the black satin underneath.


I made this skirt so that the flower embellishment was interchangeable. I took a flower hair clip that I had already made and added the pin onto the back of it. This way the skirt would be perfect for "black and orange day" (their semi Halloween celebration) at school and also for School Spirit Friday . . .


which is black, green and white.


Anyway . . . you get the idea!

Happy Crafting!

xoxo, Amy


Monday, October 3, 2011

Quick Roses


These roses are so quick to make and look adorable no matter where you use them!


I made this cute little corsage for the Daddy-Daughter Dance.

If you want to make something like this look for the yo-yo tutorial here
and the rolled rosette tutorial here.


What You'll Need:
Fabric [2 inches by 15 inches]
Small Piece of Matching Felt

Needle
Thread

Scissors

Center pieces [rhinestones, buttons or beads]


Take the fabric and fold it in half hot-dog style.


Once you have the 1 inch strip, tie your thread to one end and baste stitch to the other end.
Pull tight like you're making a ruffle, and roll into a flower shape.


Hot glue to felt and under each layer, then add your center piece.


Quick. Simple. Beautiful!

Tuesday, September 6, 2011

Fabric Flowers - 2 more styles ~ Tangled & Pinwheel


TANGLED FLOWER
[LOTUS or ROSE STYLE]


WHAT YOU'LL NEED:

*Scraps of Fabric

*Scraps of Tulle (diamond & the bigger mesh stuff)

*3 Different size circles to trace
(I used a jar, and the top & bottom of a vitamin jar.
My flower is 3 inches without the tulle)

*Scissors

*Needle & Thread

*Small Piece of Felt

*Hair clip, Pin Backing, or Headband

*Buttons, Beads, Rhinestones or some other blingy for the center

*Hot Glue Gun & Glue


First, you'll need to trace 6 circles of each size onto your fabric.
[18 total]


And, cut 6 squares of tulle slightly larger than each of the 3 sizes of circles. [18 total]
Also, cut 6 squares of the large mesh tulle slightly larger than your largest circle.


You will need to repeat these next few steps for each petal. Starting with the large circles. If using tulle, place the it on the right side of the fabric, like this:


Next, fold the 2 pieces of fabric in half, making sure that the edges of the circle match up,
like this:


Fold in half again, lining up all 4 edges of the circle, like this:


Now, take you thread and double it up on the needle by threading it
then tying both ends together. Fasten to open end of the quarter circle.
Baste stitch by hand along the edge, like this:


Once you get to the other end, pull the thread tight to create a ruffle type effect,
and do not tie off thread, like this:


I know its kind of hard to see in that last picture, so sorry!
It was a little hard with the glare from the shinny fabric + tulle,
but I think you can still get it.


After you finish one petal, you'll start over with the next one using
the same thread as the petal before.
Here is what it would look like if it were a 5 petal flower:


When you have all 6 petals of the large size on the thread,
pull it tight & hold tightly with your fingers.
On the back side of the flower, run your thread through
the first & last petals where they meet a couple of time, then fasten off.
Like this:


This next step is unique to the bottom layer only.
Take your large mesh tulle and fold it in half on its diagonal so it becomes a triangle.


Fold it in half again. . .


And one more time. . .


Now, place it behind a petal, with the point in the center and sew on. I decided that maybe the next flower I make like this I'll only put like 2 pieces of tulle on in between petals, because its cute and looks more, ummmm mature that way ;) But, since this is for my 9 year old, the more princess I could make it, the better. Anyways, if you want to attach it all the way around, just repeat until you get to the beginning again then fasten off and cut thread off.


Here is what it looks like from the front with all the tulle in the back.
I cut the excess diamond tulle from the petals before I
sewed the large mesh tulle to the back.


Now, repeat the steps for the petals for the medium size circles.
When you finish, tie off but don't cut thread. Lay them on top of the bottom layer,
and stagger the petals. From behind this layer, stitch the 2 layers together.
I did a sort of blind stitch, where I attached the top layer fabric [not tulle]
from the large petals to the bottom layer of fabric of the medium petals as close
to the base as I could get. I fastened it off and cut the thread when I got
back to the beginning. I suppose that you could hot glue them together,
but I thought it be too bulky so I chose to sew.


Ok, if you understood that last round of mumbo-jumbo,
you have to repeat it for the small petals layer. Attach it to the medium petals
the same way you chose for the 1st layers.
It should look like this when you have all 3 layers attached.


For the center of my flower, I took about 8 inches or so of the
purple fabric that was left over and made a mini rolled rose.
For those of you who do better with reading directions here is a link
to written directions. They have a ton of pictures up, but it was late a night
when I found this a few months ago & I just needed to see someone do it.
So I searched for a video, and I found this.
They're both the same method, I just needed to see it done. ;)
If you plan to wash the flower at anytime, use a fabric glue, not hot glue!


After I sewed to rolled rose to the center I hot glued the rhinestone to the center of it.


***


PINWHEEL FLOWER
Ok you'll need all the same supplies for this Pinwheel Flower as you did for the
Tangled Flower. I've made them with no tulle and they still look cute, so go with
what looks best for your hair accessory stash!


You'll need to cut 5 circles (all the same size) of each fabric & 5 squares
of the same size for your tulle. You should end up with a total of 20 pieces. You can go up to about 25, but then it starts to be too many pieces.


Once you have all of your circles cut, you'll fold them the same way as the Tangled flower. Insert the needle through the point of the quarter circle and repeat in the pattern you've laid out. For the tulle portions of this flower, I folded it the same way that I did for the tulle on the back of the Tangled flower. Once you have all your piece on the thread, pull it tight & arrange in a circle. Hold it very tightly & thread the needle through the back of the first few petals to secure it, then fasten it off.


I used beads in the center of this flower, but you can pick your own centers.
After you add the center, hot glue the flower to a small piece of felt, trim & attach to clip, pin or headband like in this tutorial. If I attach a clip I like to run a small piece of felt perpendicular to the clip & glue it so it is more secure.

Friday, August 19, 2011

DIY Fabric Covered Headband With Yo-yo Flowers

I just love this headband!
I love the colors and how the flowers, tulle and print all mesh together,
and how the chunky headband brings the whole look together.
I love it show much that I want to share how simple it was to
make so that you can make one too,
or 2, or 3, or maybe one to match your whole closet. . .


WHAT YOU'LL NEED. . .

Small Amount of Fabric

Needle & Thread

Buttons, Rhinestones, Beads or Some Other Center Piece

Hot Glue Gun & Sticks

Felt

Tulle


The first thing you are going to do is trace and cut out circles from the fabric of choice.


The yo-yos will be 1/2 the size of the circle you cut so make sure you cut them big enough.
I traced the oatmeal canister, the top and bottom of a large cup, and the bottom of a smaller cup. I cut 2 of each because I made a matching broach to go with a dress.


Take your thread and double it over, then tie it off.
Hand stitch a basting stitch all the way around the perimeter of the circle.
Try to stay as close to the edge as possible, like 1/8 of an inch.
I suppose you could use your machine, I just like to hand stitch these.
Plus I feel like I can get closer to the edge by hand.


Once you stitch all the way around,
pull the thread tight just like when you make a ruffle.
Tie the thread off inside of the gather to hide it. Then flatten to form the yo-yo.


After you finish all the yo-yos you want to use,
sew or hot glue buttons, rhinestones or beads to the center to create the flower look.
Arrange the layout you like, then hot glue to felt.


Trim the felt from your arrangement.


To make the headband, cut the fabric to size.
I started by putting a dot of glue at each end to tack the fabric into place. Then I put a line of glue inside the headband and pressed the fabric to it.


Last, I glued the other side to the band.
I worked with small sections to ensure the fabric was tight all the way around.


This is what it should look like when the fabric is all glued to the headband.


Now add some tulle to your arrangement,
if you like it and glue the whole thing to the headband.


See, its simple! And cute! And, and, and fun to make cute things :)