I have recently discovered that I can design subway art on photoshop elements! I am thrilled and a tad addicted to doing this now with every quote I fall in love with.
I want to show you what I have made. Feel free to print it from my site. Just let people know where you got it from pretty please! Sorry, I don't know how to load it so that you can download it. You'll just have to right click and copy and save it into the file of your choice. I need to learn to do that And learn how to download fonts onto my computer! I am sure it is easy, but when I am uncertain of how to do things I always find a way to put off doing them.
So I printed these off in an 8x10 and mounted them on foam board with spray adhesive.
This was my first attempt and what I learned is that I needed to save a little more margin room so that words wouldn't be covered once they were in a frame. But since they are mounted on the foam board, i just stood them up in an easel next to the rest of my decor and it loos just fine.
Use them if you can!
xoxo,
Amy
Wednesday, November 6, 2013
Wednesday, September 18, 2013
Post Work Out Pumpkin Pie Smoothie (*2 WW pts)
My Favorite Fall Food? Pumpkin Pie. Hands Down. No contest. But my waist line doesn't agree with too many serving of the tasty treat, so I had to come up with an alternative. Enter, Pumpkin Pie Smoothie.
I have lost more than 25 pounds in the last 6 months and so I am always looking for healthy treats; especially treats that are helpful post work out. I am totally satisfied with this smoothie. I heard about it through social media and did a search for recipes. After reading through and trying several, I decided to tweak them all a little to make a concoction that I like the best as well as had a ll the food benefits i was looking for.
Let me tell you why I used Plain Greek Yogurt. It is jam packed with protein. Greek Yogurt has 21g of protein Peanut Butter has 7g. You can use vanilla Greek yogurt (which is tasty) if you need a little extra flavor, just remember it has 22 sugars, which is kind of a lot. Or maybe you could just add a tsp or two of vanilla extract. Up to you, if sugar is a concern.
I also used a whole banana because if you eat a banana within the first 15 minutes of finishing your workout, instead of storing as fat, it will store as energy to be used later in the day. BONUS!
Next, I use Coconut Sugar instead of regular refined sugar. I don't like Splenda or Stevia, but you could use those. It just that there are so many health benefits associated with coconut. And coconut sugar tastes so good. AND, when being substituted for sugar it is a 1:1 ratio exchange. You could also use honey or agave nectar.
I use almond milk but coconut would be just as yummy.
And did you know that cinnamon is an antioxidant??? Okay, onto the recipe:
Post Work Out Pumpkin Pie Smoothie!
(See above text for substitutes and modifications)
Makes 2 8oz servings
1/2 Cup Canned Plain Pumpkin (not pie)
1/2 Cup Plain Greek Yogurt
1/2 Cup Almond Milk
1 Ripe Banana
5-7 Ice Cubes
1/2 Tbl Coconut Sugar
2 tsp Pumpkin Pie Spice
2 tsp Cinnamon
1/2 tsp Vanilla Extract
Blend and enjoy!!
Edit: My friend, Whitney pointed out to me that this is just *2 Weight Watchers Points a serving. You could drink the whole blender full for just 4 points!
XOXO,
Amy
I have lost more than 25 pounds in the last 6 months and so I am always looking for healthy treats; especially treats that are helpful post work out. I am totally satisfied with this smoothie. I heard about it through social media and did a search for recipes. After reading through and trying several, I decided to tweak them all a little to make a concoction that I like the best as well as had a ll the food benefits i was looking for.
Let me tell you why I used Plain Greek Yogurt. It is jam packed with protein. Greek Yogurt has 21g of protein Peanut Butter has 7g. You can use vanilla Greek yogurt (which is tasty) if you need a little extra flavor, just remember it has 22 sugars, which is kind of a lot. Or maybe you could just add a tsp or two of vanilla extract. Up to you, if sugar is a concern.
I also used a whole banana because if you eat a banana within the first 15 minutes of finishing your workout, instead of storing as fat, it will store as energy to be used later in the day. BONUS!
Next, I use Coconut Sugar instead of regular refined sugar. I don't like Splenda or Stevia, but you could use those. It just that there are so many health benefits associated with coconut. And coconut sugar tastes so good. AND, when being substituted for sugar it is a 1:1 ratio exchange. You could also use honey or agave nectar.
I use almond milk but coconut would be just as yummy.
And did you know that cinnamon is an antioxidant??? Okay, onto the recipe:
Post Work Out Pumpkin Pie Smoothie!
(See above text for substitutes and modifications)
Makes 2 8oz servings
1/2 Cup Canned Plain Pumpkin (not pie)
1/2 Cup Plain Greek Yogurt
1/2 Cup Almond Milk
1 Ripe Banana
5-7 Ice Cubes
1/2 Tbl Coconut Sugar
2 tsp Pumpkin Pie Spice
2 tsp Cinnamon
1/2 tsp Vanilla Extract
Blend and enjoy!!
Edit: My friend, Whitney pointed out to me that this is just *2 Weight Watchers Points a serving. You could drink the whole blender full for just 4 points!
XOXO,
Amy
Friday, June 28, 2013
Cookies On A Stick! Patriotic Edition!
What happen when a cookie and a lolly pop get married? They have cookie-pops!
What a yummy way to celebrate our Independence!!
First of all, I admit that I totally cheated! In our house my husband is the baker and he makes the most AH-MAZING cookies. So I will not even try to compete. Instead I just use the family recipe that My Aunt Nestle Toll House passed down to me. Had he been home I would have sent Aunt Nestle packing.
This is what you need:Cookies- from scratch or from Nestle
Popsicle sticks (one per two cookies)
2 cups confectioners' sugar
3/4 cup butter (1 1/2 sticks) unsalted buttered, softened
1 TBL milk
Make your filling while the cookies are baking:
on medium speed beat together confectioners' sugar, butter and milk until smooth, thick frosting is created.
Use a few drop sof food coloring to color a bit of the frosting. I didn't measure. I'd say maybe 1/8 of a cup.
Let your cookies cool completely
Spread about two tsp. of filling onto flat side of one cookie.
Press a Popsicle stick into frosting, then sandwich with a second cookie (flat side down). Refrigerate until firm.
I used skewers and that is why I am giving you the benefit of my mistake you can use lollipop sticks, but I really think Popsicle sticks would work best.
Tie wit a decorative bow.
So cute and so yummy!
Happy Independence Day!
Happy Baking!XOXO,
Amy
Sand Art! A Patriotic Kid's Craft!
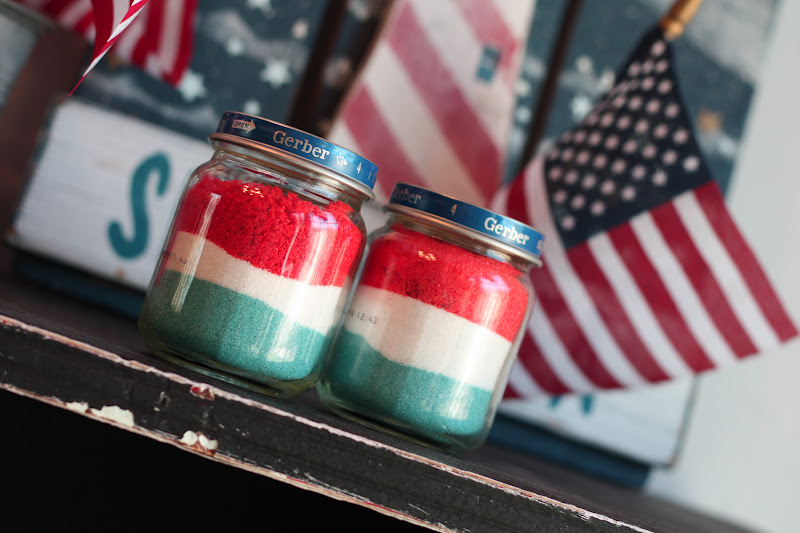
The 4Th of July is right around the corner! I love America and I love the 4TH of July! I love celebrating our precious freedom with family and friends and fireworks! Here is a picture of today’s activity:
SAND ART
It is so fun and easy and it kept my kids busy for over an hour. Of course you know you aren’t restricted to the red, white and blue colors. You can do any colors you would like! I just thought they would be fun decor for the holiday.
These are your needed items:
*Zip Loc sandwich bags (one bag per color per child if you want them to mix their own- it is part of the fun)
*Sand from the dolor store (one time I used salt and it works just fine)
*One baby food jar per child ( or whatever glass jar you want to fill.)
*Food coloring. To get a bright red gel food coloring is best. I used the regular liquid food coloring for the blue.
* Small funnel (optional)
I filled my 1/4 cup measuring cup half way (1/8 of a cup) and poor it into a zip loc bag and added a tiny bit of red gel food coloring. I scooped the gel out of the container with a knife.
I did this for each of my girls. Sealed their bags and let them mix the food coloring and the sand. It helps to squeeze most of the air from the bag.
I let them shake the bag and , push the bag and do whatever it takes to spread that color around. It really isn’t hard, but it is kinda fun!!
Repeat this process with your other color(s).
Using a funnel is optional, but it did make transferring the sand to the baby food jar a little less messy. We filled the bottom third with the blue coloring first.
Then we added the plain white sand . . .
And topped of the jar with a little red sand!
After making our patriotic sand decor, my kids then began to mix other colors with sand to fill more baby food jars. They really had a blast and like I said it kept them busy for over an hour. 
My kids enjoy seeing their arts and crafts used as decorations around the house. I think it make them feel somewhat special to see the things they have created in a place of honer. It is good for the old self-esteem you know!
I hope you enjoyed this sand art project and I hope that you get to try it out with your little ones!
Happy Crafting!
XOXO,
Amy
Cake Pops or Rice Krispy Treats: Turn Them into Your Patriotic Centerpiece!
Why not kill two birds with one stone and create a centerpiece for your table that is also
a tasty treat or party favor???
My kids hate cake, but I could barely keep them away from these long enough to take a picture.
This is what I did:
Made chocolate cake pops, cut my wooden skewers in half and stuck the cake pops on top, dipped them in white chocolate, added sprinkles on top. I used blue food coloring to my white chocolate to create a few blue chocolate cake pops. I melted my chocolate in a tiny white melting pot. I used coconut oil to thin out the chocolate. You can also use the microwave. Melt a few chips 10-15 seconds at a time. Stirring in between.
I used a cube shaped styrofoam base to stick the pops in, wraped it with burlap which i pinned into place with straight pins. Cut a length of red and white ribbon, pinned that into place, made a little blue bow and pinned that into place. You could hot glue them if you wanted, but I like to use pins so that I can change up the look when ever I want.
If you don't have a way to make cake pops, don't despair!!! You could do this:
I have to admit, I totally cheated. I had every intention of making home made rice krispy treats. I had all the ingredients, but between all the "mom, can you do this and that for me" from my four kiddos, i decided to take the easy way out. I opened my pantry and there were several store bought rice krispy treats that began to call my name.
So, I cheated. I pulled the wrappers off and smooshed the pre-cut rectangular shape into a little ball. Stuck in a stick, dipped it in white chocolate and covered it with sprinkles. I did have to promise my husband that I would make "real" rice kripsy treats though, as those are the only kind he really likes.
Cheating sure save time though.
These were such yummy treats! I hope you enjoyed this show and tell!
Happy Independence Day!
XOXO,
Amy
So, I cheated. I pulled the wrappers off and smooshed the pre-cut rectangular shape into a little ball. Stuck in a stick, dipped it in white chocolate and covered it with sprinkles. I did have to promise my husband that I would make "real" rice kripsy treats though, as those are the only kind he really likes.
Cheating sure save time though.
These were such yummy treats! I hope you enjoyed this show and tell!
Happy Independence Day!
XOXO,
Amy
Patriotic Wreath: Burlap and Ribbons!
Images of my childhood days are always brought to the forefront of my mind when I think about the 4th of July. We did the same thing every year, a tradition you might say. Mom and Dad would pack me and my four brothers into the back of our hideous camper truck and make a 30 minute drive to my Aunt a Uncle's house for a fun filled day of swimming, jumping on the enormous trampoline (which back then, not everyone had), food, cousins and fireworks.
Before dark, our entire family family would leave my Aunt and Uncle's house to stake out the perfect firework viewing area. We went the same place every year, but it filled up fast. We brought blankets and pillows to lay on and goodies to snack on while we waited with anticipation for the show to start. The firework show was always amazing. The burst of color and light seemed to exploded right over our heads. Some of the fireworks were so loud they actually felt like they shook your body from the inside. To this day I still get disappointed by fireworks seen from a distance.
I want to feel like I could touch them if I wanted to.
The combination of family, food, swimming and fireworks have long since made Independence Day my favorite holiday. I love the old red, white and blue!
Make it:
This wreath was really easy. I bought a dollar store wreath form. Got cheap burlap from Walmart, cut it into 6 inch strips, wrapped it around the form and pinned it into place. I used twine (also from Walmart, because that is all we have in town) and tied it around the top in order to hang the wreath. That is my basic template.
For the flowers, I borrowed the ribbon necklaces that I made for my kids to wear last year for the 4th of July. I left them in tact, folded the ribbon in the back and then used straight pins to secure the flowers to my wreath form.(tutorial link listed below)
I like to use straight pins to attach the flowers because this way I can use my burlap wreath for every holiday and sometimes baby showers. I can pin on whatever I want to match the season or event theme.
See here for a rolled flower tutorial.
Note: I used ribbon instead of fabric. I have no frayed edges on my "flowers". When I start my rolled flowers I always tie a knot at the end and wrap my ribbon around it.
See here for a tutorial on how to make a bib necklace.
Hope you enjoy this. Happy Independence Day!
Happy Crafting!
XOXO,
Amy
Before dark, our entire family family would leave my Aunt and Uncle's house to stake out the perfect firework viewing area. We went the same place every year, but it filled up fast. We brought blankets and pillows to lay on and goodies to snack on while we waited with anticipation for the show to start. The firework show was always amazing. The burst of color and light seemed to exploded right over our heads. Some of the fireworks were so loud they actually felt like they shook your body from the inside. To this day I still get disappointed by fireworks seen from a distance.
I want to feel like I could touch them if I wanted to.
The combination of family, food, swimming and fireworks have long since made Independence Day my favorite holiday. I love the old red, white and blue!
Make it:
This wreath was really easy. I bought a dollar store wreath form. Got cheap burlap from Walmart, cut it into 6 inch strips, wrapped it around the form and pinned it into place. I used twine (also from Walmart, because that is all we have in town) and tied it around the top in order to hang the wreath. That is my basic template.
For the flowers, I borrowed the ribbon necklaces that I made for my kids to wear last year for the 4th of July. I left them in tact, folded the ribbon in the back and then used straight pins to secure the flowers to my wreath form.(tutorial link listed below)
I like to use straight pins to attach the flowers because this way I can use my burlap wreath for every holiday and sometimes baby showers. I can pin on whatever I want to match the season or event theme.
See here for a rolled flower tutorial.
Note: I used ribbon instead of fabric. I have no frayed edges on my "flowers". When I start my rolled flowers I always tie a knot at the end and wrap my ribbon around it.
See here for a tutorial on how to make a bib necklace.
Hope you enjoy this. Happy Independence Day!
Happy Crafting!
XOXO,
Amy
Friday, June 14, 2013
Calcium Carbonate Chalk Paint: Upcycled Coffee Table
Don't you just love when you see a well used piece of furniture with good bones and you can
envision what it can become?
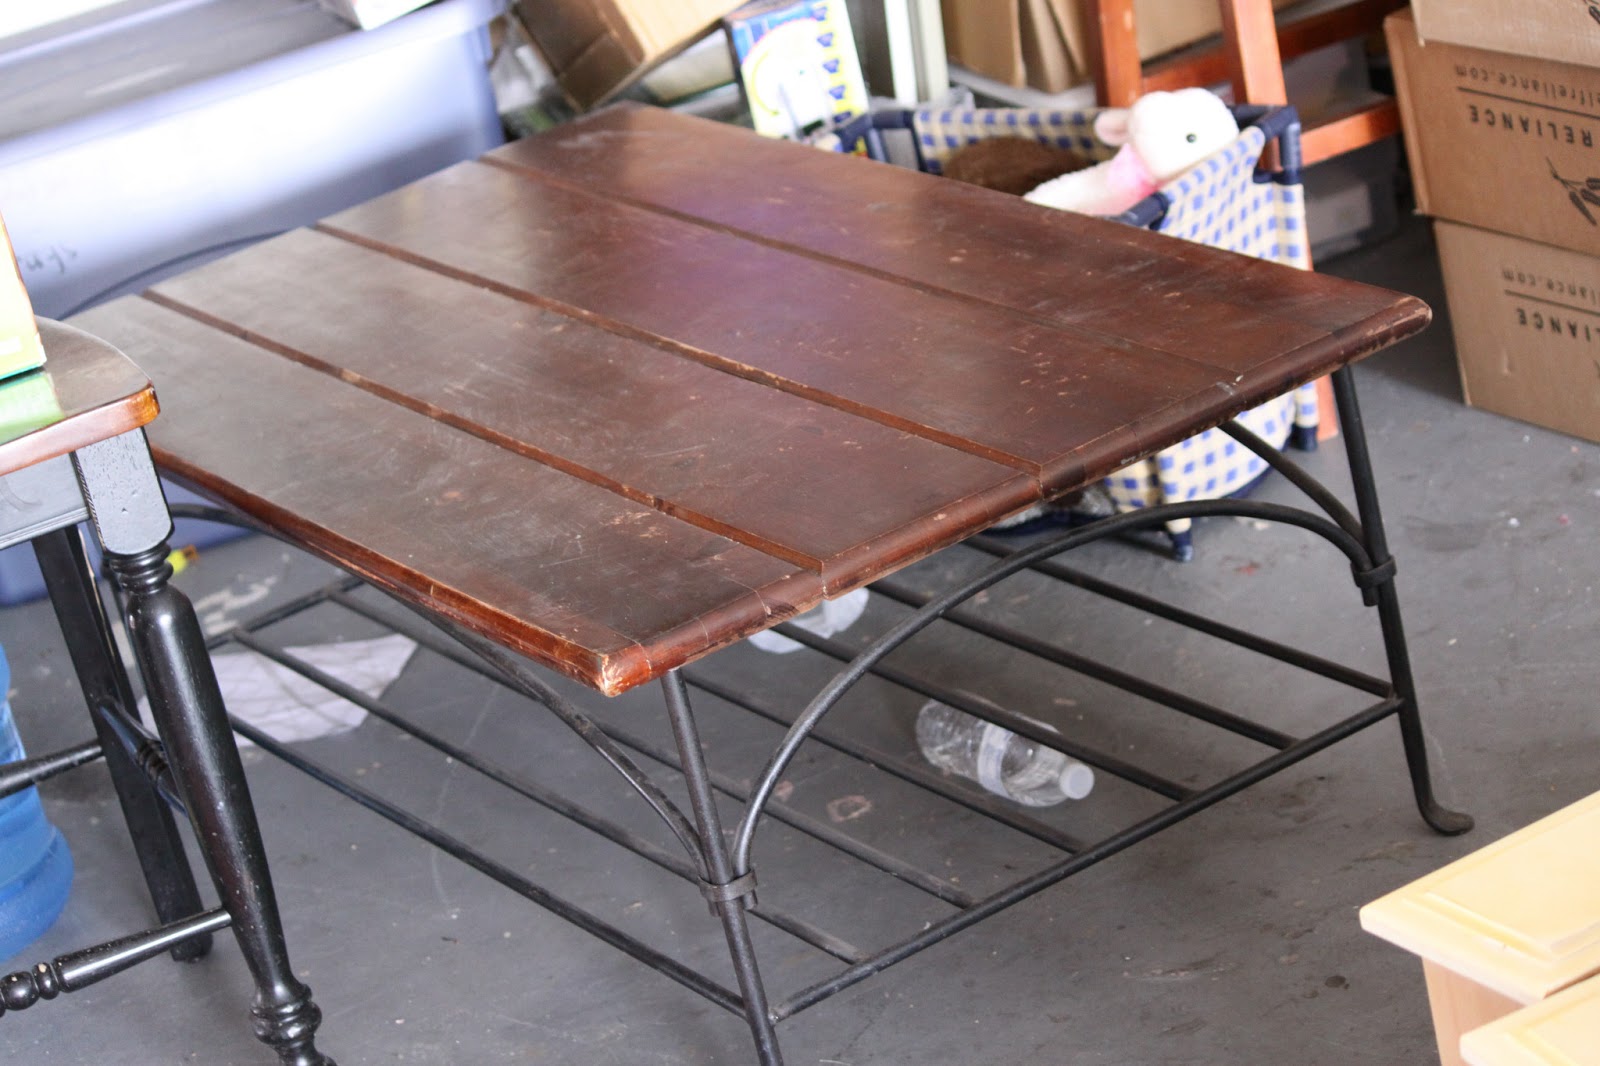
I had a wonderful girl gift this coffee table to me when she moved out of town. I loved the wood top with the iron legs. My friend, Britt and I decided to have a chalk paint testing party and this little beauty was invited.We used a calcium carbonate chalk paint recipe for this particular project:
The recipe is as follows:
Calcium Carbonate Chalk Paint Recipe:
2/3 paint
1/3 calcium carbonate
a little water
mix water and calcium carbonate first, then add to paint and mix again
* Note: other helpful tools: Hand
mixer (not necessary, but useful), mixing cup, steel wool, sand paper,
paint brush, drop cloths, finishing wax.
**Be mindful as you work that the paint dries quickly.
Finish up with your favorite wax. Here are a bunch of random angles. I felt like I couldn't get a good shot that accurately displayed how great this table looks. It is the first thing people comment on when they come into my home. I have even had a few offers form people who want to buy it!
h
Now, go find something with good bones and transform it into something beautiful and fun!
Happy Crafting!
XOXO,
Amy
Chalk Paint Wars: Calcium Carbonate vs Unsanded Grout (4 Chalk Paint Recipes)
One sunshine-y day she approached me and said,
"Amy, I think we should paint your chairs using
different chalk paint recipes so that I can
decide which recipe I want to use to paint my piano."
I thought it was a splendid idea and didn't mind experimenting on my chairs one bit; so I agreed. Painting my chairs was something that I had wanted to do, but need the right push to get . . . un-lazy.
We were a bit ambitious at first. I have five chairs and she had four recipes, but we also had three kids to add to the mix {two of them being rather . . .rambunctious} If the title gives you any indication, we only were able to attempt two recipes:
Calcium Carbonate Chalk Paint Recipe:
2/3 paint
1/3 calcium carbonate
a little water
mix water and calcium carbonate first, then add to paint and mix again
* to see coffee table painted using this recipe click here
Unsanded Grout Chalk Paint Recipe
1 cup paint
1 TBL unsanded grout
add a tbl water to the grout
mix
add to the paint
Add more water if paint is too thick one tablespoon at a time
* it wasn't until after I used this that I read the back label which clearly states that this
product can cause cancer. After reading this I don't recommend it when their are much safer methods to achieve similar results.
We wanted to attempt {but didn't get to}:
Plaster of Paris Chalk Paint Recipe:
2 latex cups paint
5T plaster of paris,
add 1-2tbls water to the plaster of paris,
mix,
then add to paint
mix again
Baking Soda Chalk Paint recipe:
1 cup latex paint
1/4 cup baking soda
mix baking soda with a TBL of water before adding to paint,
then mix in paint
* Note: other helpful tools: Hand mixer (not necessary, but useful), mixing cup, steel wool, sand paper, paint brush, drop cloths, finishing wax.**Be mindful as you work that the paint dries quickly.
*Update: Britt has since tried the other two recipes and she says the calcium carbonate is here favorite. She got it from a health food store.
Meet the Challengers:
This is Britt mixing the paint: She found that adding water the whatever medium you choose to put in to turn your paint into chalk paint works better if you mix it first with a little water, then add it to the paint and mix with a hand blender.
This is one of the three rambunctious children: We had to let them paint so we could paint . . .
As you view the pictures, you"ll notice that they aren't really step by step . . . so let me just sum up briefly: We painted both chairs with the different types of chalk paint. At this time, the unsanded grout was our favorite until we read the health warning. When the chairs were completely dry, we alternated sanding them with sand paper and steel wool. The steel wool was awesome. You don't get all the scuff marks that sand papers leaves behind, AND it added sort of an aged color which worked well since we were distressing.
It was a little frustrating at times to paint around all these grooves.
See more if Jayci here:
See more of Kona here:
See blue chair in a lemonade theme photo shoot here:
I hope you found it helpful to have four chalk paint recipes in one easy location. I would love to hear what kind you like best. If you feel so inclined as to leave a comment that is:) Otherwise,
For more: see a dresser I painted with the pink chalk paint here
and a coffee table I painted with the teal chalk paint here.
Happy Crafting!
XOXO,
Amy
Subscribe to:
Posts (Atom)