
Here is a simple tutorial for this wedding wreath. Now keep in mind that a lot of the decor for this wedding (basically all the fabric and anything shiny) was borrowed and had to be returned so we had to be creative in how we used the supplies.
(P.S. This is part of a series and if you didn't read the intro let me just say, that I was asked to make the decor for my SIL's wedding with only two days notice. So if it looks a little thrown together, it is because it really was last minute!) 
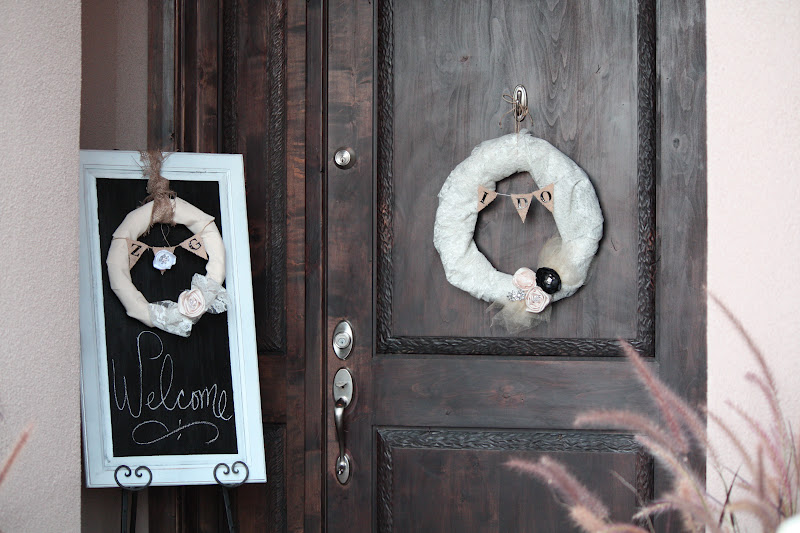
1. lace with sparkles from Joanne's (I used a whole yard because I couldn't cut the lace. but you would not need that much. 1/2 would be fine)
2. length of small pears from Robert's scrapbook section
3. Burlap
4. Dark Beige colored tulle
5. Faux crystal brooch borrowed from friend
6. Rolled satin flower hair clip with small pearls glued in center (there is also anothe singed edge flower above this one)
7. Black satin singed edge hair clip with a decorative brad in the middle
8. Faux crystal Christmas tree ornament (borrowed from friend)
9. Black scrapbook stickers from Roberts
10. LOTS of straight pins!!!!
11. Hot glue gun
12. Foam Tubing from the plumbing section of Ace Hardware or Home Depot- Super Cheap!! Mine was $1.50 at Ace.
13. Wide tape


After I had the foam tube taped together I basically wrapped the fabric around pinning it in place along the way. The fabric was folded in half several times with the sparkles on the front.
EDIT: Over time I have noticed that my foam tube lost shape, so I added a hanger inside the tube that I had twisted into circle form.
After the lace was on, I clipped on threes flowers hair clips and then pinned them into place to secure the. I pinned the crystal brooch into place and added the crystal Christmas tree ornament. I think I ended up securing it by attaching it to the flower hair clip. I bunched two different scraps of tulle together and pinned them into place.
For the burlap "I do" banner:
I drew triangles on a piece of paper cut them out and then used them as a template. I cut the triangles out of the burlap, hot glued the scrapbook letters to it (for extra staying power) and then hot glued the burlap triangles to the length of pearls. I hot glued the ends of the pearls to straight pins and then pinned them into the back of the wreath where no one could see them.
Everything was removable.
Now, if you have to make flowers to add to your wreath, here are some tutorials: rolled flowers and singed flowers. (for the rolled flowers, I like using ribbon when you don't want the frayed edges look.)
Now . . . Onto Wreath Number 2!

These were so easy to make and because everything was removable, you could make a new wreath for every season and eliminate the need to store a million wreaths! Find chalkboard tutorial here.


I hope you make wonderful things!

XOXO,
Amy
No comments:
Post a Comment