A Dumping Ground For Good Ideas!

Everything That Makes A House A Home!


Showing posts with label Kid's craft. Show all posts

Wednesday, July 9, 2014

DIY: Painted Shirts

DIY Painted Shirts

I LOVE the idea of painting shirts! You can do any color or any design to fit ANYTHING! I gotta give credit to my friend Jodi, because she is the one who taught me how to paint my own shirts! So far I have also used it to decorate a pillow case for Father's day. No pictures of that though!

 Let's get started!

This is what I used:
The cheapest shirts and tanks I could find
Freezer paper
Straight Edge Knife ( I got mine in the scrapbooking section)
Something to cut on like a self healing board or thick cardboard
Stencil to trace on freezer paper (sometimes i free hand, some times I trace, sometimes I print and image from the compute)
Iron
Paint and Paint Brush:  Here you have a few different choices, You can use puffy paint which is a great option. Don't forget the paint brush.
You could use a fabric spray paint- I used a Tulip Brand. I love this but the colors seem limited.
You could also use a regular craft paint and add a fabric medium which makes the paint soft on your shirt. You can find it at any craft store. I actually used all three on the shirts I did this particular day.

So here we go:
The first step is to choose your stencil.
Once you do you need to trace it onto the freezer paper. You will trace your stencil onto the dull side of the freezer paper. The shiny side is the part that will adhere to your shirt. DO NOT TRACE ON THE SHINY SIDE.
Next Cut your stencil out using your straight edge knife.
Place shiny side of freezer paper onto your shirt and Iron. I have never paid attention to my temp settings. You do want to make sure that the edges of the wax paper are secured to the shirt to avoid the paint  bleeding through.
Select you paint method and paint your stencil.

For the shirt below I used craft paint mixed with a textile medium.
Leave your stencil on for a few minutes but remove before the paint is dry. It is a lot harder to remove the stencil when the paint is completely dry.

I usually let my shirts dry over night.

Here are some others:
For this tank, I used spray paint on the star part. I actually laid those glow in the dark stars on top of the shirts so I wouldn't have to cut them out. Since I used fabric spray paint I had to be really careful about covering the rest of the shirt to protect it. I just cut out a large area of freezer paper and ironed it on for protection. It was a really hot day so it only took 15 minutes to dry. Then I let my 11 year old iron on strips of freezer paper for the stripes because she likes to do things herself.
The red is craft paint with a textile medium mixed in.

Here she is, painting away! We used a strip of painter's tape at the end to cove a place that I didn't get freezer paper and it worked great.

 For the shirt below, I did end up tracing all the star shapes onto freezer paper and cutting them out. The bright blue stars were spray painted, the darker ones were puffy painted and the sleeves were craft paint wit a fabric medium. I hot glued the bow on and so far it has survived one wash:) In fact I liked all the shirts better after having gone through the wash. They looked softer somehow.

I made the shirts below at Christmastime using Puffy Paint For the tutorial, click here.


Sadly, this is the only picture I got of the new shirts! Must be my pregnant brain! My son in front of the neighbors house!
Edit: Two more Pictures!!!


It was a pretty great day though!
Remember with DIY: Painted shirts the possibilities are endless. You could do any design for any occasion!
Happy Crafting!
XOXO,
 Amy


Friday, June 28, 2013

Sand Art! A Patriotic Kid's Craft!


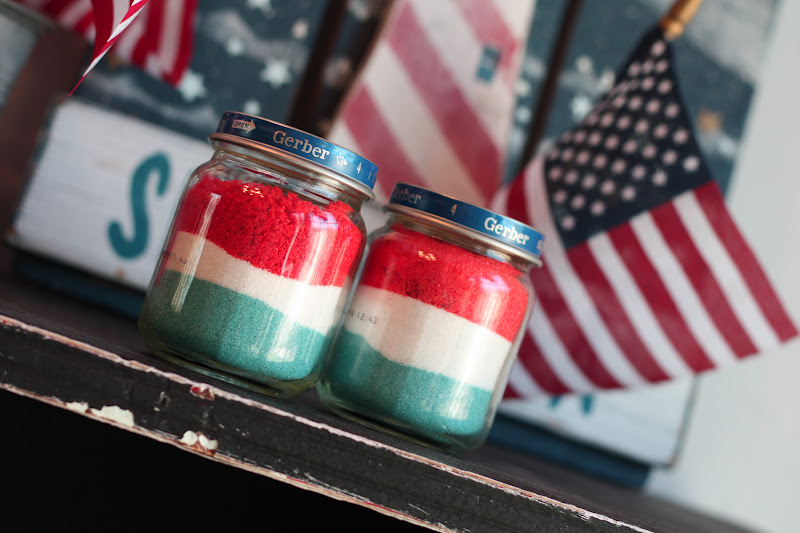
The 4Th of July is right around the corner! I love America and I love the 4TH of July! I love celebrating our precious freedom with family and friends and fireworks! Here is a picture of today’s activity:
SAND ART
It is so fun and easy and it kept my kids busy for over an hour. Of course you know you aren’t restricted to the red, white and blue colors. You can do any colors you would like! I just thought they would be fun decor  for the holiday.
These are your needed items:
*Zip Loc sandwich bags (one bag per color per child if you want them to mix their own- it is part of the fun)
*Sand from the dolor store (one time I used salt and it works just fine)
*One baby food jar per child ( or whatever glass jar you want to fill.)
*Food coloring. To get a bright red gel food coloring is best. I used the regular liquid food coloring for the blue.
* Small funnel (optional)
I filled my 1/4 cup measuring cup half way (1/8 of a cup) and poor it into a zip loc bag and added a tiny bit of red gel food coloring. I scooped the gel out of the container with a knife.
I did this for each of my girls. Sealed their bags and let them mix the food coloring and the sand. It helps to squeeze most of the air from the bag.
I let them shake the bag and , push the bag and do whatever it takes to spread that color around. It really isn’t hard, but it is kinda fun!!
Repeat this process with your other color(s).
Using a funnel is optional, but it did make transferring the sand to the baby food jar a little less messy. We filled the bottom third with the blue coloring first.
Then we added the plain white sand . . .
And topped of the jar with a little red sand!

 After making our patriotic sand decor, my kids then began to mix other colors with sand to fill more baby food jars. They really had a blast and like I said it kept them busy for over an hour. 
My kids enjoy seeing their arts and crafts used as decorations around the house. I think it make them feel somewhat special to see the things they have created in a place of honer. It is good for the old self-esteem you know!
I hope you enjoyed this sand art project and I hope that you get to try it out with your little ones!
Happy Crafting!
XOXO,
 Amy

Tuesday, October 30, 2012

Kid's Craft: Halloween Eyeball Wreath

In case you missed it . . . this is what I posted for the wonderful blog called, Honeybear Lane:


Today I want to show you how to make this "spooktacular" (yep, I went there!)  eyeball wreath with your kiddos! (I have to admit, even I got addicted to gluing eyeballs in place!)
Here's it is:
 What you will need:
Wreath form: I used a toy inner tube, but a foam pipe insulator would be perfect (Home Depot, Lowe's Ace)
googly eyeballs
black ribbon or scrap fabric (double the length of your wreath form)
Ribbon in orange to hang the wreath
black tulle (optional)
Elmer's Glue/ Tacky Glue or Hot Glue- any will work
Paint brushes (I used q-tips and poured the glue out on a piece of foil for the kids to dip)
Two Straight pins
 This is the foam pipe insulation that I referred to above. Form it into a circle with the slit on the outside and tape together.

Choose a starting point on your wreath and pin your fabric or ribbon into the foam. Wrap your fabric around the wreath form and pin in place.
 It should look like this so far . . .
 I wrapped a small piece of foil at the top of my wreath so that the kids wouldn't glue any eyeballs there because that is where the ribbon will be placed.
 As you can see we didn't dress up for this craft session . . .These are pictures of the kiddies, totally engrossed.
 f
 f
 f
 We added all the eyeballs we had at the time. Then I went to the store and added more. I also added a bit of ribbon to hang the wreath and a little black tulle to add texture.
Super easy and fun! I did this with my 5, 7 and 9 year old. They all loved it! Hope your little ones do too!

As always, It has been a pleasure!
Happy Crafting!
-Amy

Wednesday, October 17, 2012

Edible Kid's Halloween Craft: Monster Popcorn Hands!

 Time to celebrate the season by making spooky monster hands!You only need three things to make this treat!
 Grab your favorite little helpers and these items:
 Popcorn - Candy Corn - Vinyl Gloves
 Super easy . . . pop pop corn and let cool, pass out gloves, put some candy corn inside and have the kiddos shake them down . . . two or three may gather in the same finger hole, so space evenly.
 It should look like this: (love that smile)
 and that one too . . .
 Then add popcorn and shake it down into the finger holes as well. You might have to do a little crunching to get it to fit. Don't worry, it will be okay. Tie the top in a not or close it off with a bread tie.
 Enjoy . . .

 and be a little silly . .


Happy Halloween and
Happy Crafting!
XOXO,
 Amy
Friday, August 17, 2012

Personalized Candles- The Feautured Craft on Honeybear Lane

I did another craft tutorial for kids on Honeybear Lane. I got the idea from dear old Robyn Sullivan. I would love it if you could stop by and comment or "like" it so Heidi thinks I am worth keeping me around. Click here to check it out.
 It is such a fun simple craft! Visit Honeybear Lane and check it out!

Wednesday, August 15, 2012

Kids Craft: DIY Piggy Banks!

*** Note*** This was the guest post I did for Honeybear Lane lat month. I didn't change it because . . . because I am feeling a little bit lazy if you want to know the truth . . . 


Hello Honeybear Lane readers!
I am so happy that Heidi is letting me join you again. I am Amy, from Amy's Craft Bucket. 
I love my kids. I love crafts. I especially love making crafts with my kids. I hope you'll stop by and discover fun ways to keep little hands busy.
SO here we go:

I have had a long love affair with the dollar store. Rows and rows of discounted items that can be easily transformed into treasure really makes me excited. Well guess what, my children how just recently discovered their own love for the dollar store. My number three child is always asking me what kind of chores he can do to earn a dollar.  I love it! As far as I'm concerned its a win win situation for me. 
But where do you put your hard earned dollars? You make a cute "piggy" bank of course. Alright, so this isn't a piggy. I can't pull one over on you. So you wanna know
Alright, so this isn't a piggy. I can't pull one over on you. So you wanna know what it really is? This little bank happens to be made out of one of my old Slim Fast cans. But you can use any can you have on hand.
 You will need:
*1 Slim Fast or other can
*1 piece of scrap book paper
*scissors
*paint brush
*mod pogde or other glue
*a little hot glue helps but is optional
*twine or ribbon for embellishment
*Exacto knife to slice hole in top of lid

Start by carefully stripping the can down to it's naked self and slice a coin drop into the lid (you do the slicing not your child, please:)).
 Use the Slim Fast wrapper to measure a out how much scrapbook paper you will need to cover the can.
 12x12 wasn't quite big enough to fit around my can so I ended up cutting another little strip of paper to fill the gap that was left to close.
 I let my kids use a paint brush to smooth on some mod podge around the can and wrap the scrap book paper around it. I think I used a little hot glue to secure the ends just so we wouldn't have to wait so long for the glue to dry.

 Then we glued on the extra strip of paper that we measured out.

 So far it looks like this:
 This is the my other hard little worker and her bank:

 To finish off our little bank we tied a piece of twine around it, which I hot glued to the back of the can so that it wouldn't get lost. We also cut out a circle tag with each child's name on it in order to stake clain to what was rightfully theirs:)

We are currently in the process of making a very manly Captain America bank for my son. I would love to show you how it looks. I will feature it on my blog in the near future. I would be honored to have you stop by Amy's Craft Bucket. Let me know you came by!
Thanks for having me Heidi!
Until the next time Honeybear Lane!
Happy Crafting!
XOXO,
Amy