A Dumping Ground For Good Ideas!

Everything That Makes A House A Home!


Showing posts with label DIY. Show all posts

Wednesday, July 9, 2014

DIY: Painted Shirts

DIY Painted Shirts

I LOVE the idea of painting shirts! You can do any color or any design to fit ANYTHING! I gotta give credit to my friend Jodi, because she is the one who taught me how to paint my own shirts! So far I have also used it to decorate a pillow case for Father's day. No pictures of that though!

 Let's get started!

This is what I used:
The cheapest shirts and tanks I could find
Freezer paper
Straight Edge Knife ( I got mine in the scrapbooking section)
Something to cut on like a self healing board or thick cardboard
Stencil to trace on freezer paper (sometimes i free hand, some times I trace, sometimes I print and image from the compute)
Iron
Paint and Paint Brush:  Here you have a few different choices, You can use puffy paint which is a great option. Don't forget the paint brush.
You could use a fabric spray paint- I used a Tulip Brand. I love this but the colors seem limited.
You could also use a regular craft paint and add a fabric medium which makes the paint soft on your shirt. You can find it at any craft store. I actually used all three on the shirts I did this particular day.

So here we go:
The first step is to choose your stencil.
Once you do you need to trace it onto the freezer paper. You will trace your stencil onto the dull side of the freezer paper. The shiny side is the part that will adhere to your shirt. DO NOT TRACE ON THE SHINY SIDE.
Next Cut your stencil out using your straight edge knife.
Place shiny side of freezer paper onto your shirt and Iron. I have never paid attention to my temp settings. You do want to make sure that the edges of the wax paper are secured to the shirt to avoid the paint  bleeding through.
Select you paint method and paint your stencil.

For the shirt below I used craft paint mixed with a textile medium.
Leave your stencil on for a few minutes but remove before the paint is dry. It is a lot harder to remove the stencil when the paint is completely dry.

I usually let my shirts dry over night.

Here are some others:
For this tank, I used spray paint on the star part. I actually laid those glow in the dark stars on top of the shirts so I wouldn't have to cut them out. Since I used fabric spray paint I had to be really careful about covering the rest of the shirt to protect it. I just cut out a large area of freezer paper and ironed it on for protection. It was a really hot day so it only took 15 minutes to dry. Then I let my 11 year old iron on strips of freezer paper for the stripes because she likes to do things herself.
The red is craft paint with a textile medium mixed in.

Here she is, painting away! We used a strip of painter's tape at the end to cove a place that I didn't get freezer paper and it worked great.

 For the shirt below, I did end up tracing all the star shapes onto freezer paper and cutting them out. The bright blue stars were spray painted, the darker ones were puffy painted and the sleeves were craft paint wit a fabric medium. I hot glued the bow on and so far it has survived one wash:) In fact I liked all the shirts better after having gone through the wash. They looked softer somehow.

I made the shirts below at Christmastime using Puffy Paint For the tutorial, click here.


Sadly, this is the only picture I got of the new shirts! Must be my pregnant brain! My son in front of the neighbors house!
Edit: Two more Pictures!!!


It was a pretty great day though!
Remember with DIY: Painted shirts the possibilities are endless. You could do any design for any occasion!
Happy Crafting!
XOXO,
 Amy


Tuesday, June 12, 2012

Homemade Father's Day Candy Message!

Want to give Dad a little sweetness this Father's Day? Well look no further! Give him a note that is sweet and delicious!
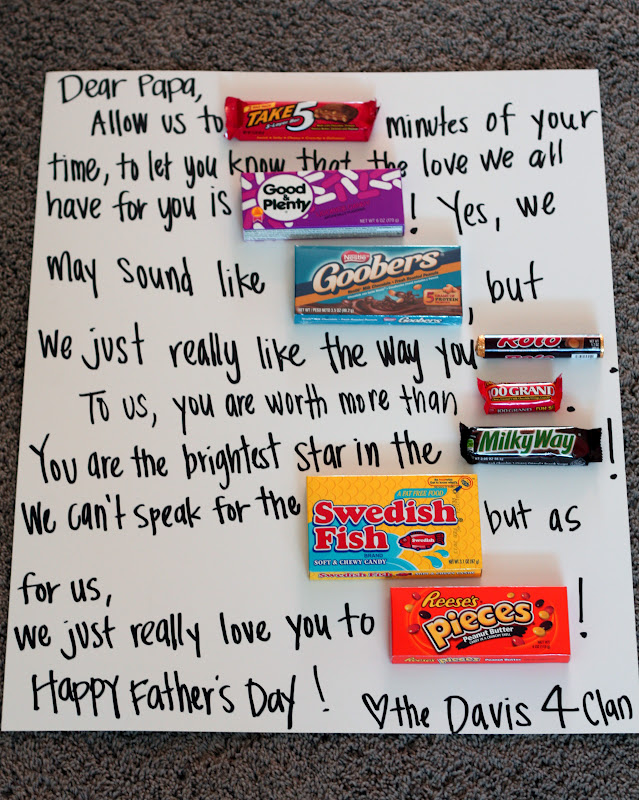
Candy to use: Take 5, Good and Plenty, Goobers, Rolos, 100 Grand, Milk Way, Swedish Fish, and Reese's Pieces!


Here is what I wrote: Adjust as needed:


Dear Papa,
        Allow us to Take 5 minutes of your time, to let you know that the love we have for you is Good and Plenty! Yes, we may sound like Goobers, but we just really like the way you Roll!
        To us, you are worth more than 100 Grand. You are the brightest star in the Milky Way! We can’t speak for the Swedish, but as for us we just love you to Pieces! Happy Father's Day!

Love,
 The Davis 4 Clan 

Happy Crafting!
xoxo,
 Amy


P.S. Need some Father's Day Printables? Check out this blog! Ami has compiles a huge list!


Easy Homemade Father's Day Card

Father's Day is knocking on the door! It is time to tell the Father in your life just how much you love and appreciate him. Okay, really you should do that everyday, but if you don't make sure you do on Sunday!!!
I just had to share this cute little card. 
 Don' t you love it! 
It's Dad's work shirt! It is so simple to make so grab your little ones and get started.
You need:
Paper:
I used: 2 12x12 scrapbook pages (but really you could use computer paper and crayons if that was all you had,or you could use construction paper)
scissors
A ruler
a glue stick or tape
pencil
 Fold your paper in half. Use your  ruler to measure the top (folded) part of the paper. This will be your collar.  I drew lines three inches in on both sides.

Then cut along the lines and carefully fold down.

 It should look like this

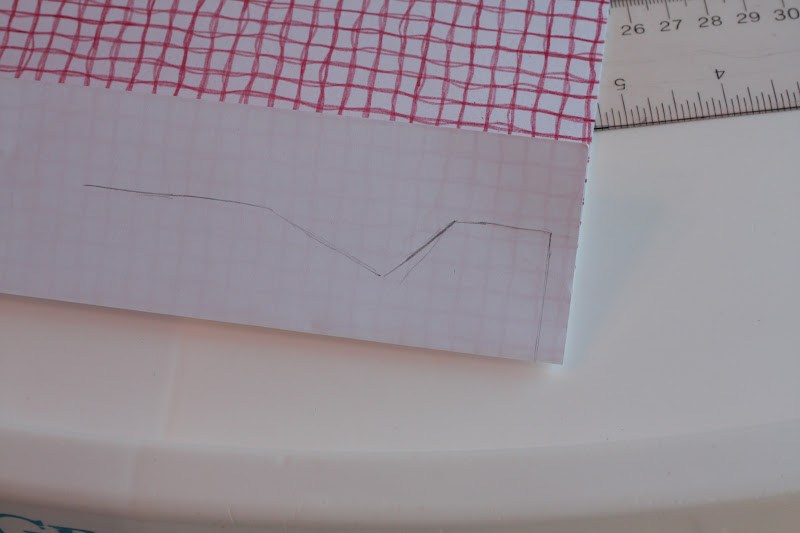
Next I wanted to draw a tie. I just free handed it. It wasn't perfect so if you are looking for perfection you best seek another tutorial:) Perfection doesn't often happen here:)
 I decided my free hand wasn't even so I fold the tie in half and cut along the edge I like best.
 It turned out like this:
 I cut the bottom of the tie to be even with the bottom of the card. Glue down (or tape) the tie and the collar.
 Here it is . . .
 If a tie seems to hard you can glue some buttons on instead. You can also cut out a square and make a pocket! Get creative!
 Anyways, here is the finished product. Don't forget to add a sweet little note to Dad!

Happy Crafting!!
XOXO,
 Amy

Tuesday, May 8, 2012

Add Glitter To Your Frame!

Man!! Life has been so incredibly busy! I am sure you know how it is, sometimes real life takes presidence over life in the virtual world. I did want to share this fun little project with you. Let me teach you how to take rock an ordinary picture frame. The secret weapon: Glitter!
I started out with a $5 gold frame from Walmart. I don't usually love gold, but this time it was my color of choice.
You will also need:
Modge Podge
Paint Brush
Glitter
Some kind of drop mat to catch excess glitter
Clear Finishing Spray. (I used Krylon Gloss Clear Protective, non yellowing, finishing spay)
I used a cookie sheet covered with parchment paper for my work space. I painted a somewhat generous layer of modge podge on the edges of my frame and immediately sprinkled glitter over the glue.
The outside edges of the frame can be tricky to get glitter on so I kind of scooped up the glitter that had fallen on the parchment paper and pushed it onto the glue.
Allow to dry completely. Drying times vary. 30  mins to an hour maybe. When your frame is dry. Stand it up right and tap it gently to let excess glitter fall onto your parchment paper. After add another layer of modge podge (paying close attention to any bald spots) and add glitter again. I repeated the process twice, but that may also vary. Just keep gluing and glittering until you are happy with your final product. Make sure you allow ample time for your frame to dry in between. Carefully fold parchment and dump excess glitter back into your glitter jar.
When your last layer is dry, move your frame to a well ventilated area and add 1-3 coats of clear gloss allowing ample time to dry in between each coat. About 10-20 minutes. When your last coat is dry, gently tap your frame to remove excess glitter. Now, if your frame is like mine, the glitter has found its way into any nook and cranny available. You can use a compressed air duster or your hair dryer on its coolest and lowest setting get rid of it.
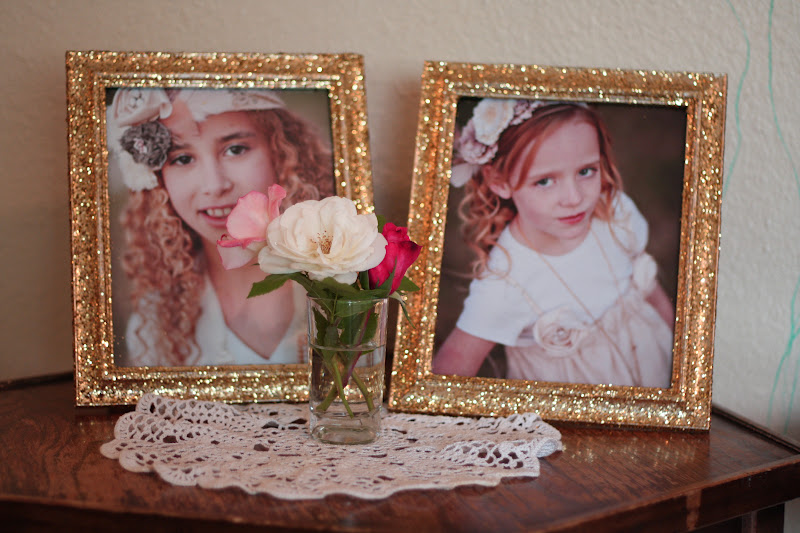
When your frame is finished . . . display your favorite picture!!! I used these glittered frames as another decoration for my girls' b-day party. It was the perfect touch of sparkle to make their beautiful pictures a fancy focal point.
I hope you have fun with this one! Use any color glitter that your little heart desires!!
Happy Crafting!
xoxo,
 Amy

Tuesday, April 10, 2012

Tulle Pom Pom Topiary DIY

I really don't need an excuse. I love to make pretty things. I love to create and since we have one more family birthday party coming up, I feel like I had good reason to make these beauties. 
 I made the tulle pom poms using the tutorial I found here. However, I did modify the project a bit to make my pom pom a little bit larger. I used to 8 in paper plates as my template to wrap the tulle around.
 and they turned out like this:

To finish the look, I filled three tins with rice, tied a hot pink ribbon around the center and then hot glued the pom pom onto the top of wooden skewers.

The fun thing about this little project is that you can modify the colors to match the color scheme of any party! And all of the supplies are relatively inexpensive. Just go to your local dollar store and look around!

Happy Crafting!
XOXO,
 Amy

Wednesday, March 7, 2012

Crochet Baby Cocoon ~ Photo Prop: PART 1

When I was pregnant with my youngest daughter, I saw all kinds of cute crochet cocoons in friend's pictures. After several trial runs I came up with this pattern. I made a lot of them & we loved them when our baby was little because they were blankets that never fall off. It so nice not having to fuss with a blanket. I am going to have 3 separate posts with 3 different variations to this pattern.


The hooks needed for these patterns usually come together in a pack. They are the largest plastic hooks found in the crochet aisle ~ the small gray one is size P & the large blue one is size Q} Here are the 3 different variations of this pattern and the hook size needed for each that I will post.


2 strands of yarn {gray hook size P}
1 strand thick yarn {gray hook size P}
3 strands {blue hook size Q}


What You Will Need:
{2 strands variation} 
*Size P Crochet Hook 
*2 skeins of yarn - I use Red Heart Yarn 


Here are the abbreviations that you will need to understand to complete this pattern. If you want to know how to do any one of these stitches, please click here. To learn how to start the yarn on your hook, click here.

Abbreviations:
ch = chain
dc = double crochet
sl st  tog= slip stitch together


At the end of each round you'll see 'sl st tog'. You'll want to sl st into the little v that was created at the top of the 1st stitch for that round.

To start, take both yarns and tie together to start on hook like shown here.


ch 4, sl st into 1st ch to form a circle
Row 1: ch 1, 10 dc, sl st tog              {10 stitches}
Row 2: ch 1 2 dc around, sl st tog                  {20 stitches}
Row 3: ch 1, *1 dc, 2 dc* repeat around, sl st tog               {30 stitches}
Row 4: ch 1, *1 dc, 1 dc, 1 dc, 1 dc, 2 dc* repeat around, sl st tog            {35 stitches}
Row 5-25: ch 1, 1 dc around, sl sl tog                                 {35 stitches}

On row 25, fasten off and hide tail.  Admire your cute little cocoon!


For Matching Beanie:


ch 4, sl st into 1st ch to form a circle
Row 1: ch 1, 10 dc, sl st tog              {10 stitches}
Row 2: ch 1 2 dc around, sl st tog                  {20 stitches}
Row 3: ch 1, *1 dc, 1 dc, 1 dc, 1 dc 2 dc* repeat around, sl st tog               {24 stitches}
Row 4-7:  ch 1, 1 dc around, sl sl tog                                 {24 stitches}


On row 7, fasten off and hide tail.  Admire your cute little beanie!

Thursday, January 12, 2012

Oversized Pictures Made Cheap

I absolutely love over-sized pictures on bare walls.

While trying to figure out how exactly Pinterest works, I came across THIS tutorial from Sugar Bee Crafts & now I can't wait to try it out.


The best part is that she said the print only costs $8 for 3 x 4 feet & the backing was $11 {which gives you more than enough for 1 print}


Happy crafting :)

Friday, December 2, 2011

DIY Felt Headbands and Velcro Flowers!

I think I log a lot of bathroom hours . . .hold on, it's not what you think . . . I am the mama to three little girls (and one sweet little boy) so with four heads of female hair to do every morning, we log a lot of bathroom hours. See, I told ya, it wasn't what you thought:)
Because I have so many little girls, I have a fondness for hair accessories. Like these:

Brown Paper Packages is one of the lovely blogs I follow (and you should too) and she did a post about these headbands and I wanted to try my hand at them because I thought: no.1 they looked cute and no. two they looked easy! Mine are slightly different from hers however and I'll show you what I mean below.


I didn't want to use an elastic headband for my 8 and 6 year old so I opted for a soft plastic headband instead. I buy a special kind on line that don't cause any pain behind the ears so my kids actually don't mind headbands.


I attached the the soft part of the Velcro in one one spot only on the felt bow but put the tougher side of the Velcro in multiple places on the headband. The felt sticks to Velcro pretty good so I felt like I didn't need to attach both pieces of Velcro at every point on the headband.


I then proceed to attach the felt bows with sticky back Velcro. I added a little hot glue for added hold. The reason I did this is because I already have a drawer full of headbands and really didn't want to add more to it. The idea for me was to simply make the felt bow interchangeable.


The other difference is that I simply used craft felt because it is what I had on hand and haven't the foggiest idea where to get better felt. It would most likely require a trip to a larger town:)

Thank you Kierste, from Brown Paper Packages, for shring your cuteness!

I applied the same idea of interchangeable hair pieces when my third baby girl was born a little over a year ago. I didn't want to have millions of elastic headbands cluttering a drawer so I used the circle sticky back Velro again adding a little hot glue for extra hold.

That way I just had to change out the flowers to match outfits and when her head grew, I only had to replace one elastic headband.


Front of the flower:

Back of the flower!

Happy Crafting!
XOXO,
Amy

Friday, November 25, 2011

DIY Flannel PJs ~ Part 2: The Top

So here goes part 2! There are more steps in making the top, but you can do it :)


First things first, lets talk Black Friday at Joannes ~
Doors opened at 6 am & people weren't killing each other to get anything!! Everyone was patient getting in the door and shared their flannels :) It was the best Black Friday experience
I've ever had! I scored some uber cute flannels!


Plus, the store employees gave everyone the coupons when you walked in,
so I got an additional 25% off my entire order & 50% off my oldest daughter's
Christmas gift since it wasn't on sale.
OH YES!!


I can't wait to cut into these!
EEEEEEEEEEEEEEE :)


What You'll Need:
1 1/2 Yards Flannel Fabric {this will cover the shirt as well}
About 24 Inches Grossgrain Ribbon
4-5 Buttons Depending On The Size
Matching Thread
And Your Sewing Machine & Tools :)
Also, I used my Seger, but if you don't have one use your zig-zag stitch.


Bring back your paper bag and let's make the pattern. If you have a pair of pjs to trace, then trace each piece. If not, grab a shirt that fits your child loosely. If all you have are onesies, you can use it for your pattern, just make sure to add a few inches to give some room.


If you're using a loose shirt, ignore the sleeves for now & trace the back twice.
Cut 1 out & cut down the middle, then retrace adding 1 1/2 inches to the center.
You only have to create one side because you can flip the pattern over. Next, draw
the neck line how you want it. I like an angled neckline on these type of jammies.
For the collar, measure along the neck line of your pattern for the length, then
make a rectangle with the width of 3 1/2 inches. You can keep the angles sharp
or round them, whichever you like. After you cut everything out, take the front
panel and you're going to trace along the center line and 2 inches at the top & bottom,
keeping the angles the same at the neck line. Draw a line connecting top to bottom,
this is for the reinforcement fabric behind the buttons and button holes.
For the pockets, make a 4 inch square.


Trace each piece on your flannel or fleece. Make sure that you flip the patterns
over for the front panel, reinforcement pieces & collar pieces. In this picture
I marked where the 1 yard mark was so you could see.


But I forgot to make sleeves :)


So take your back & front panels, and line them up at the shoulder, then trace that round angle. For 12 month size, measure out 7 inches from each end & then square off the bottom of the sleeve. Trace those onto your flannel.


Cut each piece out and get ready to sew and serge. First, sew at the shoulders,
then serge or zigzag stitch. Next, serge the bottom edges of the sleeves and
pockets & hem the same way I described in part 1. Add the ribbon about
1/2 inch from the bottom and stitch on both edges.


Pin the sleeves to the front & back panels then sew and serge.


It should look like this after the sleeves are on. Set the pockets aside for a later step.


With right sides together, pin along the sleeve & the side of the shirt.
Then, sew along that seam, then serge or zigzag stitch. Next, take the reinforcement
pieces & sew them on to the center of the shirt. I like the fabric to have the
right side showing, so that's how I sewed it on. When both sides are on,
serge the bottom of the shirt then hem like you did with the sleeves.
Don't add ribbon to this hem, since you'll be adding pockets.
Flip right side out and attach the pockets. I forgot to take pictures of this step,
but its really easy ~ just fold the 3 edges under along the sides & bottom,
then stitch on. Make sure to back stitch at the beginning and end.


The collar was my least favorite part of this whole project, so beware,
it may get a little frustrating! The easy parts are: sew the ribbon about 3/4 inch
from the edge, make sure the fabric lays the way you want it to, if the fabric has a
direction. With right sides together, sew along the first short side, then the side
where the ribbon is and end on the other short side. You should have the
long side with out the ribbon left open.


This is the part that drove me a little crazy, maybe there is an easier way
to do this, I just haven't figured it out. . . fold the flannel inside itself at 1/4 inch,
then pin the neckline of the shirt inside the collar piece.


Sew along the pins, go slow to make sure that both sides of the collar stay in line
with each other & the shirt stays inside the collar. Every single one I made
I had to flip over & sew the other side because I wasn't patient enough to
follow this step, but no big deal since you have to look really close to see the mistakes ;)


The final step that I forgot to take pictures of is to measure your button holes and sew them into place. Open each button hole with your seam ripper then sew the buttons on.