A Dumping Ground For Good Ideas!

Everything That Makes A House A Home!


Thursday, August 25, 2011

Make Your Own Chalk Board

** Become a follower and be entered to win a headband as soon at we hit the 50 follower mark!


___________________________


Maybe it is because school starts in a few days . . . Maybe it is because I, myself, am a former teacher . . .but for some reason I was thinking about


chalkboards.


As a kid, I always wanted to be the one who got to go outside and smack the erasers


together in an attempt to clean them.


As a teacher myself, I just wanted a white board.


But TODAY, I wanted to make myself a chalkboard!


You wanna make one too?
You only need a few things:
I used a glass frame that I got on clearance years ago from Walmart. I took the back of mine off because this frame used to have a vinyl message on it. So really it is being repurposed. You should keep the back of your frame in tact.
Chalkboard Paint
Paint Brush


I didn't really like using these craft brushes, but at the moment it was all I had. I applied two coats and let them dry completely between each coat. I wish I would have added a third coat so it may be in your best interest to do so.


In any case follow the directions on your chalkboard paint label.


This is what it looks like after the first coat.


It won't be too long before you have a product that looks like this . . .


And you can use it for all sorts of things like this:
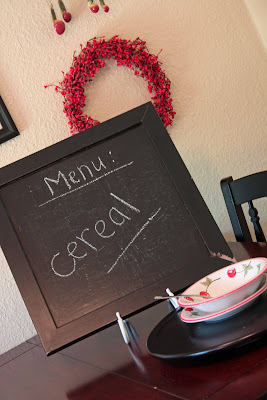


or this


or something really cute like this:


or this:


or this:

The possibilities are endless!


Happy Crafting!


xoxo,


P.S. To see more of the Johnson Photo Shoot by Yours Truly,

Click Here

Tuesday, August 23, 2011

I Love Me A Good Necklace!

My body and I

have taken quite a journey together. We have been every size from 5 to pregnant.

Four Times.

I love fashion, though it might not be evident anymore:) While not every cute shirt or pair of jeans that made my heart go pitter patter always fit, a gorgeous pair of heels or sparkly necklace always satiated my craving for fashion.


They were always one size fits all:)

My friend Angela, from The Sparkle Spot, sells jewelry. I have often bought from her (or traded at one of our boutiques). Then I saw on her blog that she was going to start selling jewelry from Paparazzi. Guess what each piece is only $5.00. Say what?! How could all this cute stuff be only $5.00? You can't even make a necklace for $5.00! I have no idea how this Hurricane, UT based company does it, but I knew I was going to be her best customer.

Then I had a thought. I could join her team. I could buy jewelry for myself and also sell it along side my headbands. The light bulb went on! Win- Win.

So, I signed up to be a consultant for Paparazzi Accessories!
Right now I have two necklaces for sale. . . $5.00 plus tax . . . a whoppin' $5.38 for all this cuteness.
Let me know if you want one.
Comment or email: amykaidavis12@yahoo.com or call if you know the number. Most of you do:)I am working on setting up a paypal account.


Each necklace costs an amazing $5.38 (includes tax)


I feel like the home shopping network!


Christmas is coming . . . just a reminder:
Oh, and if you want a larger variety to choose from,
Angela is having an Open House Thursday And Friday.
Thursday August 25th 4-8 pm Friday August 26th 10-2pm
Email me for details. I don't want to just post her address on the web:)


_____________________________


** Don't forget, Become a Follower and be entered to win a headband when we reach 50 Followers! Tell Your Friends . . . Please:) I'm begging:)

Sunday, August 21, 2011

A New Twist On Tile- DIY

** Another headband will be given away to one of our followers as soon as we get 50!

Become a follower today!!

___________________________________________________________


Every year at Christmastime, my Grandma agonizes

over getting the perfect gift for every single member in our family,

which is over 60 people!

Not every one understands that when my grandma gives a gift she wants it to reflect the love and knowledge that she has of the person who receives the gift.

She wants her gift to bring a smile or a tear or

a heart felt chuckle.

She wants to please.

I think my grandma may enjoy giving the perfect gift more than getting the perfect gift.


I also find joy in gift giving. I also enjoy creating something that has yet to exist before:) Knowing that it may not surprise you to know that I love giving unique and personalized gifts.


With that in mind . . . I created this for a wedding gift!


I promise . . . this looked so dang good! You can totally make this!


The Material's I used: (mostly from Robert's, but you can get them I'm sure at Michael's or any other craft store)


Mini pop up dots


Hot Glue Gun


Two coordinating scrapbook papers


Modge Podge


Photo Corners- clear


Gold or bronze stamp ink
Paint Brush


Vinyl or stickers words "family"
small wooden heart


brown twine


scissors


Picture embellishments (old key and cameo key hole from Bo Bunny scrapbooking)


Tile: mine was 11.5 x 11.5 (my friend gave me a bunch of tile but I usually buy them at the Home Depot for less than $3.


Before you do anything . . . plan out your lay out . . . once you have done that:


1. First cut, your scrap book paper to match the size of your tile.


2. Use paint brush to spread modge podge all over tile.


3. Apply scrapbook paper and rub with a paper towel towards edges to release any air pockets.


Let dry completely.


4. Trace heart onto paper. I thought I was going to use both sides of this scrapbook paper, I ended up just using the polka dot side to trace my wood heart and cut out the paper.


This is the cut out heart.


5. Modge podge the cut out heart onto the wooden heart. smooth out with paper towel. Let dry.


6. Use twine to tie loosely around picture and around old key embellishment.
(you can also use ribbon instead of twine)


7. Apply vinyl or stickers to the top of the project (once it is all the way dry)


7 and a half:) : add photo corners to picture and then place it on the tile in desired location.


I used photo corners because this was the engagement picture we received in the mail. With photo corners they can switch out the picture however they want.


8. When the modge podged heart is dry and you


The edges of your heart should look like this:


9. I used a little tape to make sure the key hung where I wanted it too and then I added a little hot glue.


10. To give my heart a slight 3D appearance I applied the mini pop dots, I didn't know how well they would hold so I also added a little hot glue in the middle. In hind sight I would have moved the pop up dots away from the edges just a tiny bit more so they be completely invisible once the heart was mounted.


11.Mount on tile.


11. I added pop up dots and hot glue to the cameo and mounted that on the heart.


It should look like this:


12: I inked the sides of the tile and the edges of the paper, using a bit more on the corners.


13. Tah-dah! Done! ( oh yeah- I did put a little sticker down by the bottom of the key- it says "love." Tah- Dah! Now you are done:)


This is the other one I made for my daughter. I got the idea from a display at Robert's using canvas( I didn't have canvas so I used tile). You are only limited by the scope of your own imagination! Go forth and create!


Happy Crafting!


xoxo,


Amy


Friday, August 19, 2011

DIY Fabric Covered Headband With Yo-yo Flowers

I just love this headband!
I love the colors and how the flowers, tulle and print all mesh together,
and how the chunky headband brings the whole look together.
I love it show much that I want to share how simple it was to
make so that you can make one too,
or 2, or 3, or maybe one to match your whole closet. . .


WHAT YOU'LL NEED. . .

Small Amount of Fabric

Needle & Thread

Buttons, Rhinestones, Beads or Some Other Center Piece

Hot Glue Gun & Sticks

Felt

Tulle


The first thing you are going to do is trace and cut out circles from the fabric of choice.


The yo-yos will be 1/2 the size of the circle you cut so make sure you cut them big enough.
I traced the oatmeal canister, the top and bottom of a large cup, and the bottom of a smaller cup. I cut 2 of each because I made a matching broach to go with a dress.


Take your thread and double it over, then tie it off.
Hand stitch a basting stitch all the way around the perimeter of the circle.
Try to stay as close to the edge as possible, like 1/8 of an inch.
I suppose you could use your machine, I just like to hand stitch these.
Plus I feel like I can get closer to the edge by hand.


Once you stitch all the way around,
pull the thread tight just like when you make a ruffle.
Tie the thread off inside of the gather to hide it. Then flatten to form the yo-yo.


After you finish all the yo-yos you want to use,
sew or hot glue buttons, rhinestones or beads to the center to create the flower look.
Arrange the layout you like, then hot glue to felt.


Trim the felt from your arrangement.


To make the headband, cut the fabric to size.
I started by putting a dot of glue at each end to tack the fabric into place. Then I put a line of glue inside the headband and pressed the fabric to it.


Last, I glued the other side to the band.
I worked with small sections to ensure the fabric was tight all the way around.


This is what it should look like when the fabric is all glued to the headband.


Now add some tulle to your arrangement,
if you like it and glue the whole thing to the headband.


See, its simple! And cute! And, and, and fun to make cute things :)

Wednesday, August 17, 2011

Bias Tape From Fabric


It is so easy to make your own bias tape! I know you can find it in the store, but it doesn't always match your project, and its way cheaper, quick & sew easy to just make your own.


Stuff You'll Need:

Strips of fabric (it takes about 3 inches to make 1 inch. . . .
I think, I just eye-balled it sorry!)

Iron

Ironing Board

Water or Starch


If your fabric strip needs to be longer than what you have, you'll need to sew the strips together before you do anything. Other wise the first thing you do is lay the fabric face down on the ironing board and spray it with water or starch. If you have a good steam iron you can bypass this step, just be sure to steam over each crease.


Next, fold the fabric to meet in the center. You can do both sides at the same time,


or one at a time if you feel more comfortable with that.


Iron all the way to the end then flip it over and iron again.
This will help the crease to set really good.


Turn the fabric back so that the raw edges are facing up.
Spray again and fold at the middle.


Iron again on both sides and ~
Voila! You have double bias tape in the fabric and color of your choice.


It should look like this when you finish ironing:


The final step is to take the fabric you need the tape for and sandwich it in the
middle of your tape. If you're brave you can pin and sew into place. I have not had very much luck doing it that way; however, so I hold it tight, sew a couple of inches and adjust as I go.


Now just find your little model and her show off your skills.


:)


What a cute little ruffle bottom!!!!
I got the idea for this dress from the tutorial Tibits has posted on her blog. I added a bottom ruffle, bias tape & a different style bodice. After looking at her page again, I did pretty much the same thing in constructing it, except, because I didn't use stretchy jersey material I had to add buttons so the baby would fit inside. This dress was made from my Aunt's old shirt & 1 1/2 yards of hot pink fabric.