A Dumping Ground For Good Ideas!

Everything That Makes A House A Home!


Showing posts with label patriotic. Show all posts

Wednesday, July 9, 2014

DIY: Painted Shirts

DIY Painted Shirts

I LOVE the idea of painting shirts! You can do any color or any design to fit ANYTHING! I gotta give credit to my friend Jodi, because she is the one who taught me how to paint my own shirts! So far I have also used it to decorate a pillow case for Father's day. No pictures of that though!

 Let's get started!

This is what I used:
The cheapest shirts and tanks I could find
Freezer paper
Straight Edge Knife ( I got mine in the scrapbooking section)
Something to cut on like a self healing board or thick cardboard
Stencil to trace on freezer paper (sometimes i free hand, some times I trace, sometimes I print and image from the compute)
Iron
Paint and Paint Brush:  Here you have a few different choices, You can use puffy paint which is a great option. Don't forget the paint brush.
You could use a fabric spray paint- I used a Tulip Brand. I love this but the colors seem limited.
You could also use a regular craft paint and add a fabric medium which makes the paint soft on your shirt. You can find it at any craft store. I actually used all three on the shirts I did this particular day.

So here we go:
The first step is to choose your stencil.
Once you do you need to trace it onto the freezer paper. You will trace your stencil onto the dull side of the freezer paper. The shiny side is the part that will adhere to your shirt. DO NOT TRACE ON THE SHINY SIDE.
Next Cut your stencil out using your straight edge knife.
Place shiny side of freezer paper onto your shirt and Iron. I have never paid attention to my temp settings. You do want to make sure that the edges of the wax paper are secured to the shirt to avoid the paint  bleeding through.
Select you paint method and paint your stencil.

For the shirt below I used craft paint mixed with a textile medium.
Leave your stencil on for a few minutes but remove before the paint is dry. It is a lot harder to remove the stencil when the paint is completely dry.

I usually let my shirts dry over night.

Here are some others:
For this tank, I used spray paint on the star part. I actually laid those glow in the dark stars on top of the shirts so I wouldn't have to cut them out. Since I used fabric spray paint I had to be really careful about covering the rest of the shirt to protect it. I just cut out a large area of freezer paper and ironed it on for protection. It was a really hot day so it only took 15 minutes to dry. Then I let my 11 year old iron on strips of freezer paper for the stripes because she likes to do things herself.
The red is craft paint with a textile medium mixed in.

Here she is, painting away! We used a strip of painter's tape at the end to cove a place that I didn't get freezer paper and it worked great.

 For the shirt below, I did end up tracing all the star shapes onto freezer paper and cutting them out. The bright blue stars were spray painted, the darker ones were puffy painted and the sleeves were craft paint wit a fabric medium. I hot glued the bow on and so far it has survived one wash:) In fact I liked all the shirts better after having gone through the wash. They looked softer somehow.

I made the shirts below at Christmastime using Puffy Paint For the tutorial, click here.


Sadly, this is the only picture I got of the new shirts! Must be my pregnant brain! My son in front of the neighbors house!
Edit: Two more Pictures!!!


It was a pretty great day though!
Remember with DIY: Painted shirts the possibilities are endless. You could do any design for any occasion!
Happy Crafting!
XOXO,
 Amy


Friday, June 28, 2013

Sand Art! A Patriotic Kid's Craft!


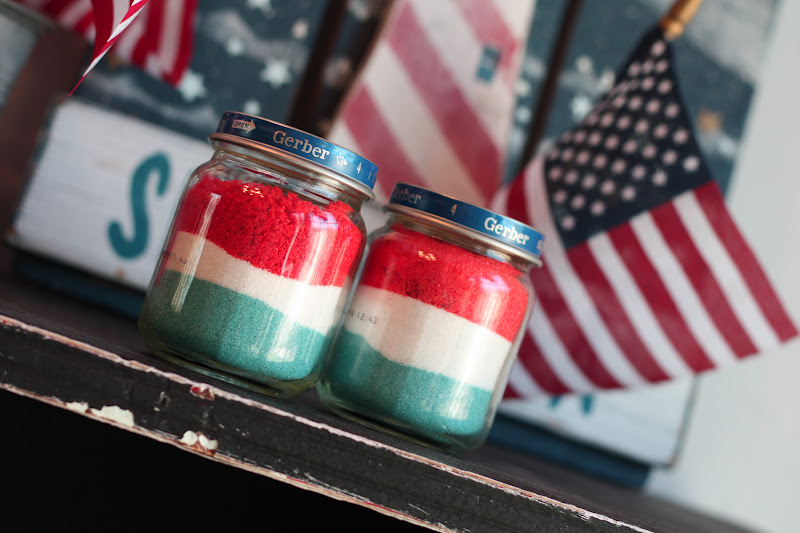
The 4Th of July is right around the corner! I love America and I love the 4TH of July! I love celebrating our precious freedom with family and friends and fireworks! Here is a picture of today’s activity:
SAND ART
It is so fun and easy and it kept my kids busy for over an hour. Of course you know you aren’t restricted to the red, white and blue colors. You can do any colors you would like! I just thought they would be fun decor  for the holiday.
These are your needed items:
*Zip Loc sandwich bags (one bag per color per child if you want them to mix their own- it is part of the fun)
*Sand from the dolor store (one time I used salt and it works just fine)
*One baby food jar per child ( or whatever glass jar you want to fill.)
*Food coloring. To get a bright red gel food coloring is best. I used the regular liquid food coloring for the blue.
* Small funnel (optional)
I filled my 1/4 cup measuring cup half way (1/8 of a cup) and poor it into a zip loc bag and added a tiny bit of red gel food coloring. I scooped the gel out of the container with a knife.
I did this for each of my girls. Sealed their bags and let them mix the food coloring and the sand. It helps to squeeze most of the air from the bag.
I let them shake the bag and , push the bag and do whatever it takes to spread that color around. It really isn’t hard, but it is kinda fun!!
Repeat this process with your other color(s).
Using a funnel is optional, but it did make transferring the sand to the baby food jar a little less messy. We filled the bottom third with the blue coloring first.
Then we added the plain white sand . . .
And topped of the jar with a little red sand!

 After making our patriotic sand decor, my kids then began to mix other colors with sand to fill more baby food jars. They really had a blast and like I said it kept them busy for over an hour. 
My kids enjoy seeing their arts and crafts used as decorations around the house. I think it make them feel somewhat special to see the things they have created in a place of honer. It is good for the old self-esteem you know!
I hope you enjoyed this sand art project and I hope that you get to try it out with your little ones!
Happy Crafting!
XOXO,
 Amy

Patriotic Wreath: Burlap and Ribbons!

Images of  my childhood days are always brought to the forefront of my mind when I think about the 4th of July. We did the same thing every year, a tradition you might say. Mom and Dad would pack me and my four brothers into the back of our hideous camper truck and make a 30 minute drive to my Aunt a Uncle's house for a fun filled day of swimming, jumping on the enormous trampoline (which back then, not everyone had), food, cousins and fireworks.

Before dark, our entire family family would leave my Aunt and Uncle's house to stake out the perfect firework viewing area. We went the same place every year,  but it filled up fast. We brought blankets and pillows to lay on and goodies to snack on while we waited with anticipation for the show to start. The firework show was always amazing.  The burst of color and light seemed to exploded right over our heads. Some of the fireworks were so loud they actually felt like they shook your body from the inside. To this day  I still get disappointed by fireworks seen from a distance.
 I want to feel like I could touch them if I wanted to.

The combination of family, food, swimming and fireworks have long since made Independence  Day my favorite holiday. I love the old red, white and blue!

Make it:
This wreath was really easy. I bought a dollar store wreath form. Got cheap burlap from Walmart, cut it into 6 inch strips, wrapped it around the form and pinned it into place. I used twine (also from Walmart, because that is all we have in town) and tied it around the top in order to hang the wreath. That is my basic template.

For the flowers, I borrowed the ribbon necklaces that I made for my kids to wear last year for the 4th of July. I left them in tact, folded the ribbon in the back and then used straight pins to secure the flowers to my wreath form.(tutorial link listed below)

I like to use straight pins to attach the flowers because this way I can use my burlap wreath for every holiday and sometimes baby showers. I can pin on whatever I want to match the season or event theme.


See here for a rolled flower tutorial.
 Note: I used ribbon instead of fabric. I have no frayed edges on  my "flowers". When I start my rolled flowers I always tie a knot at the end and wrap my ribbon around it.

See here for a tutorial on how to make a bib necklace.


Hope you enjoy this. Happy Independence Day!
Happy Crafting!
XOXO,
 Amy
Wednesday, July 25, 2012

A Craft For Kids: Sand Art!

So this is such a fun craft! This post was featured at Honebear Lane a moth ago and enough time has passed that I can feature it on my own blog now. Don't let the 4TH of July theme scare you, you can turn your sand any color you want. There are so many combos to try and your kids really will have a blast: Here is my post minus the HBL intro:

To kick things off, I'd like to start with something patriotic since the 4Th of July is right around the corner! I love America and I love the 4TH of July! I love celebrating our precious freedom with family and friends and fireworks! Here is a picture of today's activity:
SAND ART
It is so fun and easy and it kept my kids busy for over an hour. Of course you know you aren't restricted to the red, white and blue colors. You can do any colors you would like! I just thought they would be fun decor  for the holiday.
These are your needed items:
*Zip Loc sandwich bags (one bag per color per child if you want them to mix their own- it is part of the fun)
*Sand from the dolor store (one time I used salt and it works just fine)
*One baby food jar per child ( or whatever glass jar you want to fill.)
*Food coloring. To get a bright red gel food coloring is best. I used the regular liquid food coloring for the blue.
* Small funnel (optional)
I filled my 1/4 cup measuring cup half way (1/8 of a cup) and poor it into a zip loc bag and added a tiny bit of red gel food coloring. I scooped the gel out of the container with a knife.
I did this for each of my girls. Sealed their bags and let them mix the food coloring and the sand. It helps to squeeze most of the air from the bag.
 I let them shake the bag and , push the bag and do whatever it takes to spread that color around. It really isn't hard, but it is kinda fun!!
Repeat this process with your other color(s).

Using a funnel is optional, but it did make transferring the sand to the baby food jar a little less messy. We filled the bottom third with the blue coloring first.
Then we added the plain white sand . . .
And topped of the jar with a little red sand!


After making our patriotic sand decor, my kids then began to mix other colors with sand to fill more baby food jars. They really had a blast and like I said i kept them busy for over an hour. My four year old is not pictured, but even he had a fun time doing this little project.
I think my kids enjoy seeing their arts and crafts used as decorations around the house. I think it make them feel somewhat special to see the things they have created in a place of hone. It is good for the old self-esteem you know!
I hope you enjoyed this sand art project and I hope that you get to try it out with your little ones! 

Hope you enjoy crafting with your kids as much as I do!
XOxO,
Amy