A Dumping Ground For Good Ideas!

Everything That Makes A House A Home!


Showing posts with label wedding. Show all posts

Wednesday, October 3, 2012

Wedding Decor: Vitorian Burlap And Lace Theme: Simple DIY Details Revealed

(All the links Lead to Tutorials)
The gentle stroll down the aisle, the heart felt smiles and tears of joy; there is just something about a wedding. I think it is the promise of  love and the hope for a happy future. The promise to have each others back through thick and thin. We were lucky enough to add a new woman to our family last weekend! 
 Isn't She lovely?!
 My husband has NINE brothers and (yep, ten boys) and this wedding happened to be for brother number nine. I got a call two days before the wedding from my mother-in-law. It was a plea for help. She and My sister-in-law were in need of some desperate decorating help. The wedding theme was somewhat vintage with a heavy emphasis on lace and burlap decor. They had been lucky enough to borrow most of the decorations and needed some help setting the stage for romance.

Look at this cake: beautiful right? I didn't make it, but I did make that lovely lace and burlap banner behind it (with the help of a great friend! Since I only had two days to pull all of the decor together, I called my friend Ashely- who is eternally creative- and explained to her all the things I needed to have done! My oh. my can that girl work miracles!)
 The wedding was at a house near by at the home of another SIL (remember I have nine BIL'S). Her house is huge, but relatively empty as they haven't lived there long. We moved my entryway mirror on over to their house and set it up behind the cake table . . . see my beautiful fabric banner?? (see tutorial) It was the perfect touch.
 I had nothing to do with this candy favor table but I still thought it was adorable!
 Cute little cookie tray . . .
The wedding colors were red, black and white ( well she said the color was burgandy, but all the decore she chose was red, so I am saying it was red::)
Cafe Rio Catered . . . Yum!
We used my kids dresser for the sign in table . . . I spray painted an old dressed mirror to sit on top of the dresser
Lots of pictures were used as decor . . .

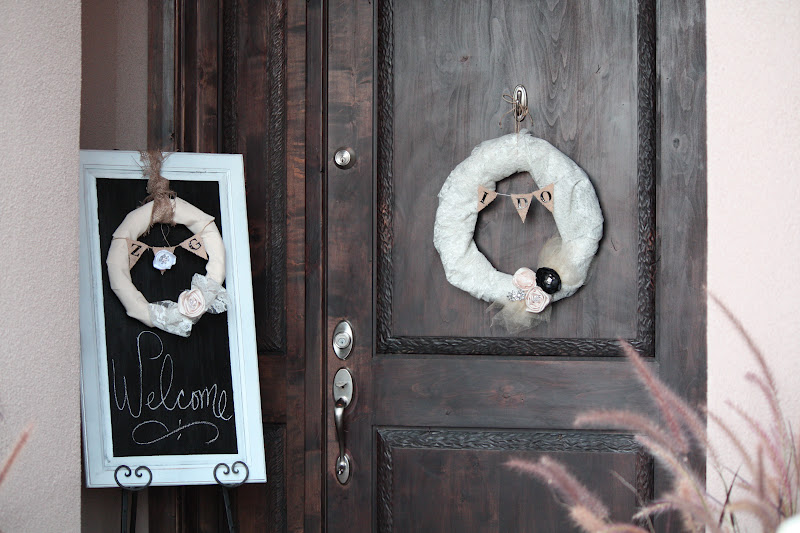
I made two wreaths and chalkboard welcome sign (see tutorial here) to garnish the entry. See Wreath tutorials here:
Wreath One: See Wreath tutorials here:
Wreath 2: See Wreath tutorials here:
Close up of Wreath 2:

Dresser and Mirror for guest book . . .(see tutorial) for spray painted mirror
Burlap and lace banner, monogrammed pillow (see tutorial), spray painted bird cage . . .
These pictures really don't do it all justice. It was dark and my camera can't really handle poor lighting, but you can get a little idea of what it look like and trust me when I say it was so beautiful!


Happy Crafting,
XOXO,
 Amy

Lace and Burlap Decorative Banner: Wedding Decor

This banner was really so easy!
I don't know if you heard the story, but I was asked to come up with some wedding decor for my SIL two days before the wedding. Not much time right. The good news in all this was almost all of the decor was borrowed from a girl who had just had a wedding with a simliar theme. It is always a good idea to save money. We went to work using the material we borrowed and turning it onto something all our own. I think what made this banner work so well was the contrast of textures.
 (Thanks to my friend Ashley for helping me with this!!)


 This is what I used:
Lace with lots of sparkles on it from Joann's
Muslin (two different types)
burlap
twine
satin fabric in beige
A crystal Christmas tree garland
 This is how you do it!!
First of all most of the fabric was already pre-cut because it had been used as chair ties for the previous wedding. We only had to cut the satin and one other type of muslin. We did this simply by making a small cut in the fabric and then ripping it the rest of the way. Each type of fabric varied in width.

We tied a length of twine to two chairs in our desired length and began to loosely tie the fabric to the twine in a desirable pattern. When we were done with the fabric we were able to detach the Christmas tree garland by the rings it used to connect each crystal together. We layered it between the fabric. I'd say it was about 18-24 inches long.

It was simple and just the right touch!

 Happy Crafting!
XOXO,
 Amy

Burlap and Lace: DIY Wedding Wreaths

Here is a simple tutorial for this wedding wreath. Now keep in mind that a lot of the decor for this wedding (basically all the fabric and anything shiny) was borrowed and had to be returned so we had to be creative in how we used the supplies.
(P.S. This is part of a series and if you didn't read the intro let me just say, that I was asked to make the decor for my SIL's wedding with only two days notice. So if it looks a little thrown together, it is because it really was last minute!)
I used (numbered according to chart below)
1. lace with sparkles from Joanne's (I used a whole yard because I couldn't cut the lace. but you would not need that much. 1/2 would be fine)
 2.  length of small pears from Robert's scrapbook section 
3. Burlap
4. Dark Beige colored tulle
5. Faux crystal brooch borrowed from friend
6. Rolled satin  flower hair clip with small pearls glued in center (there is also anothe singed edge flower above this one)
7. Black satin singed edge hair clip with a decorative brad in the middle
8. Faux crystal Christmas tree ornament (borrowed from friend)
9. Black scrapbook stickers from Roberts
10. LOTS of straight pins!!!!
11. Hot glue gun
12. Foam Tubing from the plumbing section of Ace Hardware or Home Depot- Super Cheap!! Mine was $1.50 at Ace.
13. Wide tape
 So I started with the foam tubing. It needed to be a circle obviously:) I have done this a few time and I have used all different kinds of tape, packaging tape, masking tape, duck tape, etc. They all see to work fine.
 Now this wreath actually went really fast for me because I had everything pre-made (because I sell flower hair clips) and luckily I had a few that matched the wedding colors. If you have to make your own flowers, this process will take a little bit longer.

After I had the foam tube taped together I basically wrapped the fabric around pinning it in place along the way. The fabric was folded in half several times with the sparkles on the front.

EDIT: Over time I have noticed that my foam tube lost shape, so I added a hanger inside the tube that I had twisted into circle form.

After the lace was on, I clipped on threes flowers hair clips and then pinned them into place to secure the. I pinned the crystal brooch into place and added the crystal Christmas tree ornament. I think I ended up securing it by attaching it to the flower hair clip. I bunched two different scraps of tulle together and pinned them into place.

For the burlap "I do" banner:
I drew triangles on a piece of paper cut them out and then used them as a template. I cut the triangles out of the burlap, hot glued the scrapbook letters to it (for extra staying power) and then hot glued the burlap triangles to the length of pearls.  I hot glued the ends of the pearls to straight pins and then pinned them into the back of the wreath where no one could see them.

Everything was removable.
Now, if you have to make flowers to add to your wreath, here are some tutorials: rolled flowers and singed flowers. (for the rolled flowers, I like using ribbon when you don't want the frayed edges look.)


Now . . . Onto Wreath Number 2!
 Mostly everything was the same, just using different materials. I used muslin to wrap around the foam tube and pinned it into place. I hot glued the burlap triangles onto twine instead of pearls. The flower in the center is clipped on to the burlap triangle by the brad that decorated the center of the flower. The lace bow, is bunched together because I couldn't cut it. I clipped a flower hair clip to the center of the bow. It is hung on the chalkboard sign with a loosely woven type of burlap.

These were so easy to make and because everything was removable, you could make a new wreath for every season and eliminate the need to store a million wreaths! Find chalkboard tutorial here.
 

 I hope you make wonderful things!

Happy Crafting!
XOXO,
 Amy