A Dumping Ground For Good Ideas!

Everything That Makes A House A Home!


Saturday, August 18, 2012

Printing Pictures on Fabric: From Failure to Success

 There are so many tutorials for printing on fabric. I have wanted to try it for so long and I figured my Grandma's 80TH birthday celebration was as good a time as any to try it out. I wanted to get her something meaningful and I figured pictures of her wedding day turned into a pillow might just be the right place to start.
 I have to tell you I tried this so many times before I got it to work. I mostly used the tutorial from here. But after putting fabric and wax paper through my printer 5 or 6 times and continually failing I decided I needed a new plan. After all Einstein's  definition of insanity is trying the same thing over and over and expecting different results. Time I listened. So, this is my journey from failure to success.

First off, you need,  high quality cotton, ink jet printer 9mine is an hp deskjet D2445- nothing special), a picture from your computer and matches/candle

Matches and a candle? Weird right ? This is why:
I cut out my piece of fabric and tried to get rid of any frayed ends, but as the fabric went through the computer ironed on to a piece of wax paper, the ends would still fray and the wax paper ended up separating from the fabric. I was determined to make this work however so I decided to try something drastic.

I lit a candle and carefully singed all the edges of my piece of fabric. this effectively kept all the edges from fraying and allowed the fabric to go through my computer without the wax paper and without any further problems. I was so excited! After i had the image printed on fabric, I ironed it, picture side down to heat set it a little. I don't how good that will work, but that is what I did.

This is my piece of fabric with the burnt edges and a picture of my grandparents wedding day successfully printed. In my photoshop elements program I added the lettering on the pillow.
I think this one below is what it looked like before I burned the edges.
This was their honeymoon car.
I then cut out another piece of fabric for the back of the pillow with this pint:
Pinned it together with the backs of the fabric turned out, sewed it leaving a little hole for stuffing batting in. Turned it right side out, stuffed it and hand stitched the rest of it closed.
It turned out like this:
It is a bit faded, but it was the look I was going for. I wanted a vintage feel. For the car pillow, I wish I would have put the lettering above the car instead of below so it would show up better, but hey, live and learn, right?
Right before my Grandma got married, she had a doctor's appointment to get medication for strep throat and my Grandpa had a college final. Not the typical way you would think tho spend the morning of your wedding. They met up to walk to the wedding together and they had to cross a busy street. My Grandpa yelled, C'mon Joan!" and he darted out into traffic to cross. My Grandma remained in the side walk with her feet firmly planted, not about to run into on-coming traffic. My Grandpa was sure this was a sign that meant she wouldn't follow where he lead. But she made it abundantly clear that she would follow him anywhere, except into on-coming traffic. The result of their happy marriage was, six daughters, 21 grandchildren and 30 great grandchildren and counting.
I hope that this works for you! It really is a fun gift to give.
Happy Crafting!
XOXO,
 Amy

Friday, August 17, 2012

Personalized Candles- The Feautured Craft on Honeybear Lane

I did another craft tutorial for kids on Honeybear Lane. I got the idea from dear old Robyn Sullivan. I would love it if you could stop by and comment or "like" it so Heidi thinks I am worth keeping me around. Click here to check it out.
 It is such a fun simple craft! Visit Honeybear Lane and check it out!

Wednesday, August 15, 2012

Kids Craft: DIY Piggy Banks!

*** Note*** This was the guest post I did for Honeybear Lane lat month. I didn't change it because . . . because I am feeling a little bit lazy if you want to know the truth . . . 


Hello Honeybear Lane readers!
I am so happy that Heidi is letting me join you again. I am Amy, from Amy's Craft Bucket. 
I love my kids. I love crafts. I especially love making crafts with my kids. I hope you'll stop by and discover fun ways to keep little hands busy.
SO here we go:

I have had a long love affair with the dollar store. Rows and rows of discounted items that can be easily transformed into treasure really makes me excited. Well guess what, my children how just recently discovered their own love for the dollar store. My number three child is always asking me what kind of chores he can do to earn a dollar.  I love it! As far as I'm concerned its a win win situation for me. 
But where do you put your hard earned dollars? You make a cute "piggy" bank of course. Alright, so this isn't a piggy. I can't pull one over on you. So you wanna know
Alright, so this isn't a piggy. I can't pull one over on you. So you wanna know what it really is? This little bank happens to be made out of one of my old Slim Fast cans. But you can use any can you have on hand.
 You will need:
*1 Slim Fast or other can
*1 piece of scrap book paper
*scissors
*paint brush
*mod pogde or other glue
*a little hot glue helps but is optional
*twine or ribbon for embellishment
*Exacto knife to slice hole in top of lid

Start by carefully stripping the can down to it's naked self and slice a coin drop into the lid (you do the slicing not your child, please:)).
 Use the Slim Fast wrapper to measure a out how much scrapbook paper you will need to cover the can.
 12x12 wasn't quite big enough to fit around my can so I ended up cutting another little strip of paper to fill the gap that was left to close.
 I let my kids use a paint brush to smooth on some mod podge around the can and wrap the scrap book paper around it. I think I used a little hot glue to secure the ends just so we wouldn't have to wait so long for the glue to dry.

 Then we glued on the extra strip of paper that we measured out.

 So far it looks like this:
 This is the my other hard little worker and her bank:

 To finish off our little bank we tied a piece of twine around it, which I hot glued to the back of the can so that it wouldn't get lost. We also cut out a circle tag with each child's name on it in order to stake clain to what was rightfully theirs:)

We are currently in the process of making a very manly Captain America bank for my son. I would love to show you how it looks. I will feature it on my blog in the near future. I would be honored to have you stop by Amy's Craft Bucket. Let me know you came by!
Thanks for having me Heidi!
Until the next time Honeybear Lane!
Happy Crafting!
XOXO,
Amy


Monday, July 30, 2012

Activity for Kids: Cheap, Easy, Fun!

My two year old is SO hard to entertain. She just really isn't into anything, accept making a mess. But this little activity did the trick! It actually held her attention! She wanted to do it again and again! This really is so much fun! best thing about it is that you most likely already have everything you need to do it in your kitchen!
 I found it on Pinterest, but it doesn't have a link, so if you know where it came from let me know so that I can give proper credit! This is what you need:
*Vinegar *Food Coloring* Baking Soda* Medicine Dropper

 Cover the floor of a casserole dish with baking soda. In a separate bowl mix vinegar and food coloring. You don't have to measure. It will all work out just fine. Fill your medicine dropper with the vinegar and food coloring mixture and drop it on the baking soda. It fizzles up really big and then settles into little colored polka dots.

This is Raia with her baby sitter Kaci who has been helping us since I have been injured. Even Kaci and I were entertained!
Make sure you have plenty of baking soda because if your kidsa re anything like mine, they will want to do it again and again. My nine year saw these pictures while I was posting and she wants to do it now too.
 It may be perfect for all ages!
I hope you try it and let me know how it turned out for you! I'd love to have you become a follower as well. It would make my day!

Thanks!
Have a great day!
XOXO,
 Amy

Thursday, July 26, 2012

DIY Tulle Pom Pom Trees

A couple of months ago I made these really cute tulle pom pom topiarys for a party. At the same time I also made this little pom pom tree as well, but never posted about it. So what do I say, better late than never. I made the pom poms the same way I did in the other post (highlighted above) but on a smaller scale. I think i used the bottom of a cup to make the pattern.

Then I hot glued them to a branch from a fig tree in my backyard. Tied on a little bow and used a cute little watering can full of rice to display it. My kids thought it kind of looked like Dr. Sues's truffula tree.
Anyway, here is another cute any easy project you can do in any color to match any theme or decor!
Happy Crafting!
xOXo,
 Amy

Wednesday, July 25, 2012

A Craft For Kids: Sand Art!

So this is such a fun craft! This post was featured at Honebear Lane a moth ago and enough time has passed that I can feature it on my own blog now. Don't let the 4TH of July theme scare you, you can turn your sand any color you want. There are so many combos to try and your kids really will have a blast: Here is my post minus the HBL intro:

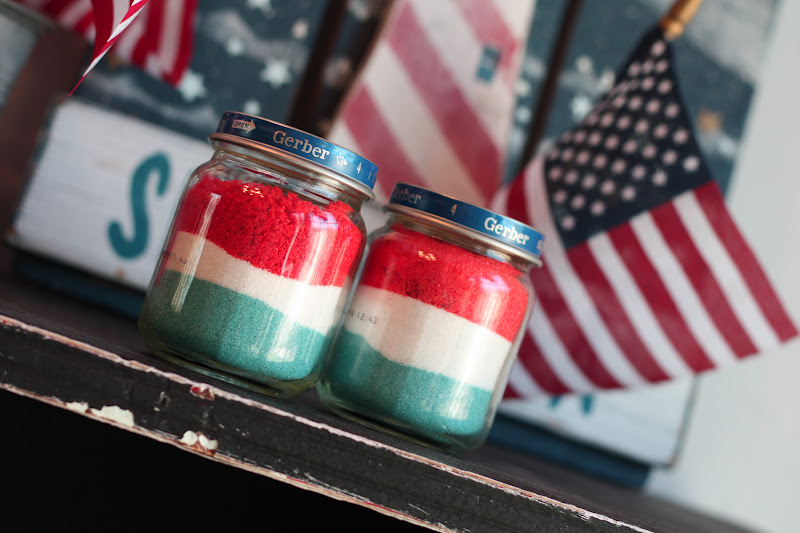
To kick things off, I'd like to start with something patriotic since the 4Th of July is right around the corner! I love America and I love the 4TH of July! I love celebrating our precious freedom with family and friends and fireworks! Here is a picture of today's activity:
SAND ART
It is so fun and easy and it kept my kids busy for over an hour. Of course you know you aren't restricted to the red, white and blue colors. You can do any colors you would like! I just thought they would be fun decor  for the holiday.
These are your needed items:
*Zip Loc sandwich bags (one bag per color per child if you want them to mix their own- it is part of the fun)
*Sand from the dolor store (one time I used salt and it works just fine)
*One baby food jar per child ( or whatever glass jar you want to fill.)
*Food coloring. To get a bright red gel food coloring is best. I used the regular liquid food coloring for the blue.
* Small funnel (optional)
I filled my 1/4 cup measuring cup half way (1/8 of a cup) and poor it into a zip loc bag and added a tiny bit of red gel food coloring. I scooped the gel out of the container with a knife.
I did this for each of my girls. Sealed their bags and let them mix the food coloring and the sand. It helps to squeeze most of the air from the bag.
 I let them shake the bag and , push the bag and do whatever it takes to spread that color around. It really isn't hard, but it is kinda fun!!
Repeat this process with your other color(s).

Using a funnel is optional, but it did make transferring the sand to the baby food jar a little less messy. We filled the bottom third with the blue coloring first.
Then we added the plain white sand . . .
And topped of the jar with a little red sand!


After making our patriotic sand decor, my kids then began to mix other colors with sand to fill more baby food jars. They really had a blast and like I said i kept them busy for over an hour. My four year old is not pictured, but even he had a fun time doing this little project.
I think my kids enjoy seeing their arts and crafts used as decorations around the house. I think it make them feel somewhat special to see the things they have created in a place of hone. It is good for the old self-esteem you know!
I hope you enjoyed this sand art project and I hope that you get to try it out with your little ones! 

Hope you enjoy crafting with your kids as much as I do!
XOxO,
Amy

Amy Davis Photography: 50 mm lens

Do you ever notice time slipping through your fingertips? I do so often. I started this post months ago when  first became a proud owner of a 50 mm lens. I drooled over this lens for months before i finally purchased it. The pictures are so clear and the focus is so sharp and it blurs the background in the yummiest of ways.
I got to shoot these lovely little boys. We're related. I don't know what you would call them, but they are my husband's cousin's kids.They are chalk full of energy and cute smiles. The real trick however was getting them to show those cute smiles to the camera.


I love the nifty 50 and highly recommend it to anyone!

You can see more pictures of this shoot here.
Happy Crafting!
XOXO,
 Amy

Keep Hair Healthy in the Summer! Tips Form our Pro, Jodi!

Summer is in full swing!  Hot days, late nights, cold drinks, Popsicle grins and lots and lots of swimming! I don't know if you are like me, but my kids swim like fish and sadly that means that often, we start seeing ugly green streaks in their hair. Is there anyway to prevent this madness! I don't know! So, I asked my friend and fabulous hairstylist, Jodi.

So without further ado . . . here she is:
This is Jodi: (the girl not the boy)
photo by Amy Davis Photography
 
First of all let's look at some of Jodi's favorite pins from Pinterest!

From: The Beauty Department

From: Love Maegan


Okay, Here are our summertime questions for Jodi!

Jodi, how on earth do you keep the green out of hair . . . you know the color your hair turns because you love to swim like a fish in the pool?
When you are in chlorinated, salt, or any other waters while the summer sun is beating on your hair you definitely need some hair therapy!
We all know the cute young blondie girls are suceptible to the chlorine turning their hair green. The best ting to do is to be proactive and protect hair BEFORE summer and swimming begins, instead of waiting until its already green.
If you are on a budget get the drug store spray in protectant or leave in conditioner before they dip into the water and second wash hair as quickly after you are done swimming as possible with Ion purifying solutions swimmers shampoo for $4.95 (16 oz.) at Sallys Beauty Supply.

If you are not on a budget I highly recommend Joico K-pak chelating shampoo, K-pak conditioner and K-pak leave in protectant. After shampooing a really good conditioner is key! When you are using any purifying, chelating, or clarifying shampoos they are stripping your hair of everything so you need to replace those nutrients lost! We all know how eager we are all for swimming weather just know this it is okay to rub sunscreen on your scalp nothing worse then a scalp burn! I love the new kids spray sunscreens I use them all the time they get to the scalp better especially on your part!

****Also, we have heard a rumor that ketchup might get some of the green out of your hair. We haven't tried it so we can"t say for sure but Jodi says it makes sense because be cause according to the color wheel green and reds are opposite each other and therefore would counteract  each other. Plus, the acids found in ketchup might also be helpful to reduce the green tint.I am totally going to try this . . .I'll let you know if it works.

From: She Does Hair


What are the fun Summer trends?  Colors and Styles? Are feathers still in? What can we expect to see? 
Summer is here and we know that means highlights. 
We will see people sporting short sassy hairstyles and we will see the biggest newest thing to just hit the red carpet reverse melting or reverse Ombre meaning you will see hair that is lighter at the scalp getting darker as it fades to the ends.
 We all saw when melting "hit" I personally thought if it was brown to blonde it just looked like they needed their roots done badly but some fun ones were black to a vibrant red. Or black to a rich purple.
 Now it will be the opposite of that just as style trends come and go so do hair styles I am seeing more hairstyles that reflect the mullet or the rat tail as the "emo" cut will fade.
The best thing about hairdressing now in all honesty is that people are not trying to get what they don't have as much anymore. They are working with what God gave them and I really think it sets you apart as an individual :) if you have crazy curly hair rock it! If your hair is super straight and thin rock it! Just don't try to rock what you weren't given!!!

And there you have it . . . insight from our favorite Hairstylist Jodi! I just think she is absolutely wonderful and can't say enough nice things about her! I hope you are having a happy and ehalthy summer and that your hair looks . . . not green. Unless you want it too:)

We would both love to hear from you! Sometimes it is so nice to ask a stylist questions with out having to visit the salon. email any question to amyscraftbucket@yahoo.com.
Find Jodi on Twitter @hairdzynr_Jodi
Have a Great Hair Day!
xoxo,
Amy

P.S. You can follow Jodi's favorite hairstyles on Pinterest!

Thursday, July 19, 2012

Make a baby hat out of an old shirt!

I had surgery on my acl a week ago today and the only good thing about being bed ridden is that I can guiltlessly search my favorite blogs and pinterest for hours on end. The down side is that I have to do it all on my hubbies IPad, and it just isn't quite the same as my computer. What I do want to tell you is that Honeybear Lane has a guest writer today, from Searching Out Simple. She does the cutest, easiest little hat tutorial for newborns using old clothes or sweaters. I love this idea. Not only is it cute but totally cost effective! I hope you get a chance to check it out. Seems like it is baby season! I am going to try to make them for my big kids too since I seem to fail at crocheting over and over again! I can't figure out how to link from my iPad so you'll have to visit the old fashioned way and type it into your browser. honeybearlane.com Happy Crafting! xOXo Amy